Inside A Makers' Studio
Inside A Makers' Studio

Easy ChalkArt Ideas
Are you searching for chalk art ideas to inspire your next DIY project? We have some fun, easy ideas for ChalkArt just waiting to be discovered in this complete guide!
Fun, Easy Chalk Art Ideas for Adults Seeking Inspiration for Their Next DIY Project!
A Makers' Studio ChalkArt is all about versatility. Use this water-based chalk paste to easily customize your furniture, tabletop décor, glass, and nearly any other non-porous surface.
What you'll love:
- After drying for just 15 minutes, you will have a beautiful piece of lettering or artwork that will leave people wondering, "how did she do it?"
- Change up your design later by simply cleaning your piece with a wet rag and creating something brand new!
- Pair with our uniquely detailed (and patented!) mesh decorative stencils to create truly professional designs on almost any surface over and over again!
Join in the fun of customizing weddings and events, hostessing like a pro with beautifully designed placemats, creating magazine-worthy furniture updates, and more with ChalkArt.
What Do You Need for These Fun Chalk Art Ideas?
All you need to create fun projects is a surface and some ChalkArt! The possibilities are endless from Dollar Tree and Target dollar section finds, to old décor you want to spruce up, to blank wooden signs or surfaces.
Check out all the A Makers' Studio surfaces and ChalkArt colors.

Fun, Easy ChalkArt Ideas for Adults: Inspiration For Your Next DIY Project
How To Create An Ombré Sign:
- This easy ChalkArt idea starts with choosing the colors you want to create your ombré effect with - we recommend starting with three and we used the following colors in the picture below: Pretty as a Peach (top color), Yes Ma'am (middle), Curb Side Shopper (bottom).
- Place your Mesh Stencil on the area you want the design
- Start with the lightest color you are using, take some on your ChalkArt Spreader, and begin spreading it through the Mesh Stencil on the area you want to be the start of your ombré
- When you have placed the product on a little over a third of your stencil, it's time for the next color
- Begin spreading your next color into the stencil starting on the outside line of where you want your second color to end, working towards your lightest color. Leave negative space in between your second and first colors.
- Now it's time for your final color, use the same technique by starting in the area of not touching your second color and working towards it. As you get closer to your second color, leave negative space.
- Once your colors are placed, it's time to blend!
- Take a little bit of both colors you are blending on your ChalkArt Spreader, then blend in the negative space you created earlier. Repeat this with your other two colors and until your stencil is completely covered!
- Voila! Enjoy your gorgeous ombré design and Enjoy the Bragging Rights!

Decorate Your Charcuterie Board:
We know that charcuterie boards have taken the world by storm. What better way to enjoy food and fellowship than inviting your friends over and enjoying a meal around this adorable board? ChalkArt is great to decorate with because it is food safe and can be washed off so you can create new designs over and over again! This easy ChalkArt idea is sure to be a hit with your guests.
Shop What She Used:
DIY Message Board:
We love having inspirational décor around our homes. Create your own chalkboard which can be erased and redesigned as often as you want. This idea for ChalkArt is inspiring, simple, and fun! Follow the steps below to learn how it's done.
Supplies:
- Metal Chalkboard Stand
- Mesh Stencil – Do As The Lord
- Dreamy Eyes – ChalkArt
- Can’t Never Could – ChalkArt
- ChalkArt Spreader
Instructions:
- Begin by cutting out your stencil.
- Then place it centered onto your Chalkboard Stand, smoothing out any bubbles.
- Next, use the ChalkArt Spreader to apply Can’t Never Could ChalkArt to all the words except “heartily” on the stencil. Be sure to apply enough pressure to push the ChalkArt through the mesh.
- To prevent the ChalkArt from drying you can carefully lift the stencil up and then back down on either side before continuing to the next color. Be sure not to lift it all the way up or you will lose your placing.
- Laying the stencil back in place, repeat the steps adding Dreamy Eyes ChalkArt to all the details along with “heartily.”
- Once done, remove the stencil and wash in lukewarm water.
Textured Wall Art:
Wall art is about more than filling space or matching your existing decor. It should also be about filling your home (or office) with things that lift you up. That’s why we love this Reminder of Hope wall art project. Using plaster, ChalkArt, and some beautiful stencils, you can create a one-of-a-kind message that reminds you to always keep the faith.

Supplies:
- Square Wooden Frame
- One Step Paint - Stoneware
- Cute As A Button ChalkArt
- Can't Never Could ChalkArt
- Venetian Plaster
- Hope Faith Mesh Stencil
- ChalkArt Spreader (2)
You will also need a small spray bottle, scissors, a bowl, and a spoon.
Instructions:
- Mix your plaster with water, using 2 parts plaster to 3 parts water. You want it to be the consistency of thicker sour cream.
- Once your plaster is properly mixed, use your spreader to apply a thin coat of plaster to your surface. Also apply consistently, scraping the excess as you go. Allow it to dry.

- Cut one spreader into 3 parts.
- Spray your dried plaster surface with a little bit of water.
- Using one spreader, apply your Cute As A Button ChalkArt in different sections of your board. The water will make it easier to pull the chalk paint across the plaster, as well as leave an authentic, aged appearance.
- Overlay plaster on the chalk paint, moving your spreader (loaded with the plaster) lightly up and down and from side to side. Continue to add plaster until you only get a small peek-through of the Cute As A Button blue paint.
- Next, lay in Can't Never Could ChalkArt and repeat Steps 5 and 6. Apply this layer only in small, choppy strokes — do not cover the entire surface. This paint will dry very light, but you don’t want a lot of it.
- Using your third spreader, apply the Gathered Rescue Restore paint lightly to your surface. Use this paint layer to blend the gray, blue, and plaster, making sure to apply as thin as possible and to leave negative space (with no Rescue Restore paint).
- Continue to add colors and plaster until you are satisfied.
- Once all the layers of plaster and paint are completely dry, cut the Hope Faith stencil and lay it on your surface in the lower right quadrant. Then, paint the “Hope” text using the Can't Never Could ChalkArt using a clean spreader.
- Remove the stencil, wash it, and lay flat to dry.

How Do You Make Chalk Art Look Good? Tips for Perfecting These Fun Chalk Art Ideas Yourself
ChalkArt is a fun and creative way to add personality and flair to any non-porous surface. Whether you're updating old furniture or creating custom décor, there are some tips and tricks you can use to make your ChalkArt look its best. Here are some tips for perfecting your ChalkArt ideas:
-
Choose the right surface: When it comes to ChalkArt, not all surfaces are created equal. Non-porous surfaces like glass, metal, wood, and plastic work best, as they allow the chalk paste to adhere well and prevent smudging. .
-
Prep the surface: Before applying the chalk paste, make sure the surface is clean and dry. Use a lint free cloth to remove any dirt, dust, or debris from the surface. If the surface is greasy or oily, use the A Makers' Studio Clean Slate to remove any residue.
-
Use the right tools: ChalkArt can be applied using a variety of tools, including ChalkArt Spreaders, brushes, Mesh Stencils, and freehand drawing. Choose the tool that best suits your design and skill level. If you're not confident in your freehand drawing abilities, stencils can be a great way to achieve a more polished look.
-
Practice your technique: If you're new to ChalkArt, it can take some practice to get the hang of it. Try experimenting with different techniques, such as layering colors, shading, and adding texture with the ChalkArt ideas and projects listed above.
-
Seal your work: Once your ChalkArt project is complete, it's important to seal it to protect it from smudging and fading. Use the A Makers' Studio Matte Sealer and a Roller Brush and Cover to keep it looking great for years to come.NOTE: ChalkArt is a non permanent paint if it is not sealed. To erase and redesign, just use a damp rag to wipe the surface clean of the ChalkArt. For your design to be permanent, seal with Matte Sealer.
With these tips and a little creativity, you can create stunning ChalkArt projects that will add personality and style to any space. So grab your supplies and get started!
Get Quality Supplies You Can Count on at A Maker’s Studio
Shop our ChalkArt colors and Mesh Stencils to get started creating your own DIY projects and start Crafting a Beautiful Life.
- ChalkArt Paste
- Adhesive Mesh Stencils
- Animal Stencils
- Bible Verse Stencils
- Holiday Stencils
- Letter Stencils
- Quote Stencils
Want to learn more? Take a look at these related articles for more information about A Makers' Studio products and project ideas:
- How to Use Stencils
- What Are Stencils?
- How to Paint with Stencils
- How to Paint Stencils on Wood
- Best Stencils for Painting
- How to Clean Stencils
- How to Use Letter Stencils with Paint
- How to Make Stencil Art
Want to see the process of cleaning stencils? Watch this short video!

How to Make Stencils At Home | Tips for Making Stencils DIY
How to Make Stencils At Home: Your Guide to Making Stencils DIY
Curious about how to make stencils at home? DIY stencil-making sounds good in theory, but we’ll show you a better way to bring your art projects to life with the help of stencils that saves you time and disappointment.
Is Making Stencils DIY Hard?
Making stencils DIY can be a great way to express creativity in crafting, painting and even baking. With the right materials and a little patience, creating customized, personalized stencils at home is an achievable task, though it is a very involved process. Making stencils DIY is a fun activity to get creative and make something unique, so don't be intimidated - give it a try!
What Material is Used to Make Stencils DIY at Home?
The most popular material for stencils is mylar or thick plastic. This makes for a durable stencils that can be used over and over, but it is not adhesive, so you will need to take care when painting that the edges are taped down to prevent bleeding.
Here are the supplies you will need to create your own DIY stencils at home:
- Mylar or transparent plastic sheeting
- Your chosen deign or pattern
- Exacto knife
- Cutting mat
- Ruler
- Low tack tape
- Sharpie or any fine tip marker
How to Make Stencils At Home: Step-by-Step Guide to Making a Stencil DIY
1. Pick a Design
You can find a pattern or design in Photoshop or other programs that offer clip art. You can also find designs online, just make sure to obtain these from royalty free sites. You can also hand draw your design freehand!
Once you've found your design, print it out in the exact size you want for your surface.
2. Trace
This is where the cutting mat comes in handy. Place the design on the mat and then add the mylar/plastic sheet directly on top. Line them up exactly corner to corner or edge to edge so they are straight. Once they are lined up, tape them down to keep in place.
Using a Sharpie or fine tip marker, trace your design onto the Mylar/plastic. Take your time and use a ruler for any straight lines. Press a little harder with the Sharpie or marker to help steady freehand lines.
Take your time when tracing. If you make a mistake, don't worry! Sharpie and marker can be removed very easily from Mylar with a Q-Tip and rubbing alcohol.
3. Cut it Out
This is a step to take your time with as well. You'll need to be very exact when cutting the design, as this will be your final stencil!
Once you've finished tracing the design onto the Mylar/plastic, remove the tape and the design underneath. Make sure that the blade of the Exacto knife is sharp and use a ruler for cutting any straight lines in your design. This works well if steady, even pressure is applied. Then you may pop out the cut pieces, being careful not to rip the Mylar when pulling away the cut pieces.
4. Start Painting
Once finished cutting out the entire design, your stencil is ready to use! Be sure to tape the stencil down to your surface and paint carefully as there is no adhesive on the back.
Save Yourself Time & Disappointment From Making Stencils DIY - Get the Best Mesh Stencils at A Makers' Studio!
If you're thinking about how to make stencils for a DIY project, save yourself time and potential disappointment by buying pre-made Mesh Stencils from A Makers' Studio! Not only will you get the perfect look and design that you need, but you'll also get a much higher quality product than if you were to make it on your own at home. Plus, A Makers' Studio Mesh Stencils are fully adhesive. You don't have to worry about taping down the stencil or bleeding lines. Mesh Stencils are also designed with intricate and beautiful details you can't possibly achieve when making yourself. You will be stunned with how easy it is to create stunning designs with no painting or crafting experience needed!
Making Mesh Stencils yourself can be a tricky process - especially if you don't have the right materials or know how - so leave it to the professionals instead. Take advantage of the great options available at A Makers' Studio and make sure your next DIY project is done right!


Why Our Stencils Are the Best Way to Create Your Art
A Makers' Studio Mesh Stencils are the perfect way to create beautiful art quickly and easily. Whether you have no experience with crafting or are a veteran artist looking for something new, Makers' Studio has hundreds of designs in multiple sizes and easy-to-follow instructions that makes creating your masterpiece effortless. With easy access to stencils, novices can look like experts in no time and artisans can mix it up and create something revolutionary. Plus, Makers' Studios Stencils are easy to find online so you can get creative right away!
These thoughtfully designed and patented Tri Mesh adhesive stencils can be combined with a variety of surfaces to create endlessly customized DIY home décor.
What you'll love:
- Create beautiful stenciled words and imagery for any occasion!
- Use over and over again on almost any surface and with almost any finish, from One Step Paint to ChalkArt and even gilding.
- New and improved design features stronger adhesive, easier cleaning, and simpler transfer between different surfaces.
Grab your favorite stencil designs and start adding artistic elements to your furniture and accents without any drawing or painting skills!

No Matter What Project You Have in Mind, We Have a Stencil For That!
When it comes to tackling a DIY project, it can be hard to find the right tools for the job. Whether you’re creating a sign for your home, painting a mural in your office or working on a craft project with the kids – you need the proper supplies and materials to make it stand out. That’s where A Makers' Studio come in! Our stencils make it easy to get precise and perfect results every time. With many sizes, shapes and designs to choose from – there is something for everyone no matter what project is at hand. Plus our stencils are super simple to use – so even total beginners can jump right into their creative projects without any prior experience. So don’t worry about struggling through your next project or making your own DIY stencils - we’ve got you covered with a stencil that fits every need!
- Quote Stencils
- Animal Stencils
- Bible Verse Stencils
- Holiday Stencils
- Pattern Stencils
- Letter Stencils
Closing Thoughts on How to Make Stencils At Home
Home-made stencils are a DIY adventure, but can be time consuming and prone to mistakes. You could lose hours of your time and end up with uneven lines or a mishap in design. Creating your own stencils is a fun way to take your crafting skills to the next level, but if you're looking for a quicker and easier way to immediately being crafting, Mesh Stencils from A Makers' Studio is the way to go. You'll get amazing results every single time. Designed and manufactured by experts in the industry, they feature intricate detailing, precision cut lines, and top quality material that lasts through repeated use. So skip the frustration of making a stencil at home and trust A Makers' Studio to handle all your stenciling needs.
Check out our hundreds of designs, pick your favorites, and get started Crafting Your Beautiful Life!
Check out these related articles for even more help and inspiration:

How to Paint Stencils On Wood | Best Way to Start Painting Stencils on Wood
Looking for the best way to go about painting stencils on wood? Our guide on how to paint with stencils on wood covers everything you need to know - including the best paint to use and how to limit bleeding!
Whether you are an experienced painter, a beginner crafter or just wanting to add some personality to your home décor, learning how to paint stencils on wood can be a fun and creative project. Stenciling is one of the best ways to create beautiful elements for your walls, furniture or other projects while still keeping the look intricate and clean. With the right materials and supplies, anyone can master this craft! This blog post will guide you through all the steps necessary in order to confidently turn stenciled art into wall-worthy pieces that provide style and value. Learn different techniques on how you can use painting with stencils on wood such as adding texture or layering colors, plus see examples of finished projects that spark your inspiration. Let's get started!

How to Paint Stencils On Wood Without Bleeding: The Best Way to Start Painting Stencils on Wood
Painting with stencils on wood can be an exciting craft project for anyone who loves arts and crafts. To maximize your artistic designs, it's important to take the steps necessary to ensure that your paint does not bleed underneath or around the edges of the stencils you are using. Taking different measures before painting with stencils on wood will guarantee you a professional-looking project in no time! To make sure your paint doesn't bleed, prepare your surface by cleaning it with the A Makers' Studio Clean Slate and making sure the surface is clean of all debris, dust, dirt, and grease. You may use a damp lint free rag if the surface is fairly clean already, but Clean Slate is best to remove grease and dirt that may not be visible. If there are any holes in your wood surface, fill them with wood filler and sand lightly once dry, thoroughly wiping away any particles. If there are any rough spots or edges on your wood surface, lightly sand those also and wipe down well once finished. It is also very important to use light coats of paint rather than thick layers so they don't create pools that could cause paint to seep beyond the perimeters of your stencils. A Makers' Studio Mesh Stencils are very finely detailed so there is no need to use a great deal of paint. Thin coats is best! Some wood surfaces will have a coarse grain which means the pores of the wood are wide set while some wood will have a fine grain which means the pores of the wood are very close together and smooth. A fine grain is ideal for painting with stencils on wood as this allows the stencil and paint to best adhere. If the wood surface you choose to use does have a coarse grain, don't worry! All you need to do to even the surface a bit is add a coat of paint before stenciling. The A Makers' Studio One Step Paint is best for painting wood and will be a great base for stenciling with additional mediums. Lastly, spray a topcoat of sealer over the final product to preserve its beauty. Following these simple steps will help you create vibrant projects without bleeding edges when using stencils on wood!

Is Painting Stencils on Wood Easy?
Painting stencils on wood is a fairly easy task, depending how you approach it. With the right tools and techniques, anyone can create beautiful artwork on wood with the help of stencils. Preparing the surface of the wood by sanding and priming it is key to achieving a crisp painting job. For best results, one should use two thin coats of paint, allowing each layer to fully dry before applying the next. This will help to achieve clean lines around the edges so that your stenciled image stands out nicely against the rest of the piece. Whether you’re a beginner or an experienced painter, learning how to paint with stencils on wood can be quite enjoyable and rewarding!
How to Paint Stencils on Wood Without Bleeding: Step-by-Step Guide to Painting Stencils on Wood for the First Time
Painting with stencils on wood can be a fun and creative way to customize your wooden furniture, walls, or accessories. However, if you're new to the process, it can be intimidating! To make sure your design looks great, follow this step-by-step guide to learn how to paint stencils on wood without bleeding.
Choosing the Right Stencils for Painting on Wood
A Makers' Studio provides some of the best and most finely detailed stencils perfect for creating designs on almost any surface. Create beautiful stenciled words and imagery for any occasion. Use over and over again on almost any surface and with almost any finish, from One Step Paint to ChalkArt and even gilding. New and improved designs feature stronger adhesive, easier cleaning, and simpler transfer between different surfaces.
Grab your favorite stencil designs and start adding artistic elements to your furniture and accents without any drawing or painting skills! Check out the various categories of Mesh Stencils below:
- Quote Stencils
- Animal Stencils
- Bible Verse Stencils
- Holiday Stencils
- Pattern Stencils
- Letter Stencils
What is the Best Paint for Stencils on Wood?
Painting with stencils on wood is an excellent way to create unique, artful projects for your home or workplace. However, the wrong type of paint can lead to a disappointing and unsightly outcome. Fortunately, there are many paints available that are designed specifically for wood-stenciling projects. One Step Paint is perfect for achieving the classic chalky finish popularized in Paris Flea Market shops. Gel Art Ink is another great option and provides a rich, permanent color ideal for fabric, apparel, and other soft surfaces as well as wood. ChalkArt paste is a removable medium that creates beautiful designs on glass, wood, and all kinds of surfaces. while Gilding and Gold Leaf offers a bright and elegant finish perfect for accentuating those special pieces of furniture. With all these options to choose from, you're sure to find the right paint for your next stenciling project on wood!

How Do You Get Clean Lines When Stenciling on Wood?
Painting stencils on wood is a great way to add some personal flair to furniture or home décor items. To ensure the best results, some preparation is necessary. Start by sanding your surface if it has any rough spots. If your wood surface has a coarse grain, you may need to add a layer of paint to smooth out the surface and ensure the smoothest adhesion. When applying your stencil to the surface, burnish it well with a ChalkArt Spreader or Squeegee to be sure that all the fine details are correctly adhered to the surface. When you are ready to paint, apply thin coats of paint rather than using thick coats for more even coverage and crisp lines. A little goes a long way! With these steps in mind, you will have beautifully painted wood items that look like they were made by a professional.

Wrapping Up Our Guide on How to Paint With Stencils on Wood
We understand that stenciling on wood can be a bit intimidating. However, it doesn't have to be with the right supplies and technique! We've gone into detail throughout this guide on how to best prepare your wood surface, the importance of a good stencil, the best paints and brushes suitable for the job, as well as helpful tips that will ensure your project turns out beautifully. With these few notes in mind, you'll have it made conquering your next stenciling project. So pick up your supplies and simply follow our elaborative instructions--you’ll soon realize that achieving decorative artwork with stencils on wood is actually quite easy. There's so much opportunity for creative expression when you’re painting with stencils on wood—it’s hard not to love something you created from nothing! With just a few tools and sound advice from us, you will reap fantastic results ready for display in no time. Don't just take our word for it - now you can go get started right away and experience what it feels like to paint on wood using stencils yourself!
Check out all the amazing designs and stencil sizes we have available:
Check out these related blogs:
- What Are Stencils?
- How to Paint with Stencils
- Best Stencils for Painting
- How to Clean Stencils
- How to Make Stencil Art


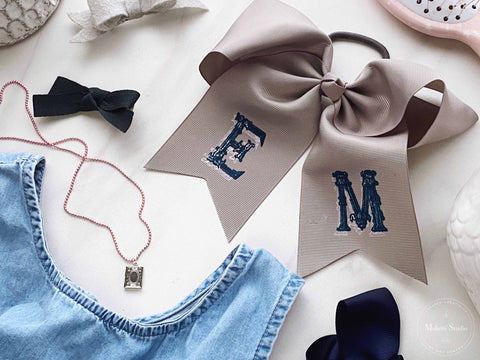
How to Use Letter Stencils With Paint | Tips for Using Letter Stencils
Are you looking for a fun and creative way to express yourself? Letter stencils can be used with paint to create beautiful works of art. Whether you’re a beginner or an experienced artist, letter stencils are easy to use and provide endless possibilities for creating unique pieces. In this blog post, we will look at how to use letter stencils with paint and the different projects that can be made using them. We’ll also discuss how to get your letter stencils from A Makers' Studio, how to lay out your letters properly, and tips on using them on wood surfaces. Finally, we'll offer some parting inspiration to get started Crafting Your Beautiful Life!
How to Use Letter Stencils With Paint: Tips for Using Letter Stencils for Beginners
What Can Be Made Using Letter Stencils?
Letter stencils offer an easy and affordable way to add personalized touches to any space. With letter stencils, you can create signs, wall décor, custom furniture designs, and much more! Whether you’re a beginner or an experienced crafter, using letter stencils with A Makers' Studio mediums is a great way to make unique and eye-catching projects.

How to Use Letter Stencils With Paint to Create Your Own Unique Work of Art
First, Get Your Letter Stencils at A Makers' Studio
If you’re just starting out with using letter stencils as part of your artistic process, the first step is to get your supplies. Most craft stores will have a selection of pre-made stencil letters, but most designs are generic and don't offer much detail. With A Makers' Studio Mesh Stencils, you can create beautiful stenciled words and imagery for any occasion! Use over and over again on almost any surface and with almost any finish, from One Step Paint to ChalkArt, and even gilding. Our patented tri mesh design features stronger adhesive, easier cleaning, and simpler transfer between different surfaces.
Check out all of the A Makers' Studio letter stencils here!
How Do You Lay Out Letter Stencils?
Once you have obtained your supplies and materials, it’s time to begin laying out your letters. When using letter stencils with paint, it’s important to ensure that each individual piece is properly aligned with the others before painting onto the surface. You want all of your letters to be spaced evenly and exactly where you want them on your piece. We recommend cutting out the letters you need to use and then arranging them on your surface how you went them before removing the white backing and adhering to the surface. The great thing about A Makers' Studio Mesh Stencils is that even if you adhere them to your surface and you don't like the positioning, you can still easily move them around. Just peel off, readjust, and adhere again! If you want your letters to be exactly centered, you may use a ruler or measuring tape to measure the distance between each letter. Or you can just eyeball them!

How Do You Use Letter Stencils on Wood?
When it comes to using letter stencils on wood surfaces, there are a few things you should keep in mind before beginning this process. First and foremost, always make sure that the surface area is clean and free from any dirt or debris which could interfere with the adhesion of the letter stencil or paintwork to the surface. One key of being successful with Mesh Stencils is to make sure the adhesive mesh sticks well to your surface. You should also sand down any rough edges along the sides of your wood pieces before applying paint so that they appear smooth once dry; otherwise, there could be inconsistencies in how each piece looks after being painted over with your chosen design template.
Additionally, always remember to use light even strokes as opposed to heavy pressure when using paint over the Mesh Stencil. This will help prevent smudging or bleeding which might occur if done otherwise. You may use a brush or a Squeegee to apply the paint over the stencil, and remember how important it is to clean your stencils after each use! See our article on How to Clean Stencils for more information. Note: Some wooden surfaces might have more uneven grain than others. The smoother the surface the better when using Mesh Stencils, so if your wood has a lot of natural grain, you might need to sand lightly or paint the wood with a coat of One Step to even out the surface before painting with your Mesh Stencil.
The best paint to use with letter stencils on wooden surfaces is the A Makers' Studio One Step Paint (check out all 50 colors!) or Gel Art Ink. Both mediums are made specifically for use with wood and will work fabulously with Mesh Stencils.
By following these simple steps and tips, you’ll be able to create beautiful wooden projects with letter stencils in no time! With a little bit of patience and practice, anyone can turn plain wooden surfaces into unique works of art with letter stencils!

Using Letter Stencils is Just One Way to Make Your Own Stencil Art…
Using letter stencils is just one way in which you can create stunning works of art for yourself or loved ones without having to invest in expensive equipment like professional artist easels or spray paints. There are countless ways in which you can apply these templates as part of larger decorating projects such as writing quotes onto walls or making signs for businesses; however no matter what type project might be at hand always remember that patience is key when attempting these types of crafts! Take your time and enjoy the process.
Take a look at all the other A Makers' Studio Mesh Stencils!
Parting Thoughts on How to Use Letter Stencils With Paint
Always remember that although they may seem simple at first glance there are still many important steps involved throughout this process such as determining what kind of paper material works best (cardboard vs paper), providing ample space between pieces when arranging them prior painting stage(so that none overlap) ,and finally taking care not skip crucial steps like cleaning off wood surfaces before attempting application phase (as this will ensure smoother finished product). In conclusion utilizing these techniques combined together offer an easy yet effective method for anyone wanting create their own customized works art!
Check out all the A Makers' Studio Stencils and related articles below:
- What are Stencils?
- How to Paint with Stencils
- Best Stencils for Painting
- How to Clean Stencils
- How to Make Stencil Art


How to Use Stencils | Using Mesh Stencils on Fabric, Wood, & More
Want to learn how to use mesh stencils to create works of art effortlessly? Your DIY projects are about to get a whole lot easier with these stencils and our step-by-step guide…
How to Use Stencils: Using Mesh Stencils to Create Effortless Works of Art

Why Learn How to Use Mesh Stencils for Your DIY Projects?
Adding a special touch to your DIY projects can be easier than ever with the use of mesh stencils. Whether you're looking for a way to spruce up your home décor or add some flair to apparel, learning how to use stencils is an essential skill.
Mesh stencils, in particular, allow for detailed designs that can't be achieved with other stenciling or painting methods. There are many skills you can gain when learning how to use mesh stencils, such as the ability to make multiple copies of a design onto one project or how to combine different colors of paint on the same design. All these skills can be applied effectively so you can successfully create patterns and designs that will truly stand out. With the right tools and tips, learning how to use mesh stencils opens up a world of creative possibilities for all your DIY projects.
How to Use Stencils: Step-By-Step Guide to Creating Your First Project
- First, Choose the Right Stencils
The A Makers' Studio Mesh Stencils are designed and patented Tri Mesh adhesive stencils that can be cobined with a variety of surfaces to create endlessly customized DIY home décor.
What you'll love:
- Create beautiful stenciled words and imagery for any occasion!
- Use over and over again on almost any surface and with almost any finish, from One Step Paint to ChalkArt and even gilding.
- New and improved design features stronger adhesive, easier cleaning, and simpler transfer between different surfaces.
Grab your favorite stencil designs and start adding artistic elements to your furniture and accents without any drawing or painting skills!
Check out these popular collections of stencils:
- Quote Stencils
- Animal Stencils
- Bible Verse Stencils
- Holiday Stencils
- Pattern Stencils
- Letter Stencils

- Second, Gather Your Supplies
A Makers' Studio gives you multiple mediums and tools to help bring your vision to life. From Gel Art Ink for fabrics and soft surfaces, to No Bake Ceramic Paint for ceramics and glass, the choices are endless. ChalkArt is removable and an ideal choice when it comes to customizing a variety of non-porous surfaces while Gilding Size helps you add luxurious details with quality gilding leaf. You can also create beautiful detailing on glass with Etching Cream to give your projects a unique touch. With plenty of colors and project surfaces available, you can choose what fits your idea best and get started crafting!
We also offer a variety of brushes and surfaces to choose from. Painting using ordinary tools like the ChalkArt Spreader or Artist Brush can help bring a unique artistry to everyday items such as the pillow cases, stationery, and canvas pouches that we offer. With the right colors and techniques, these surfaces can be transformed into stunning pieces of artwork. Plus, it is quite easy to work with these materials so even those just starting out can create something special without too much difficulty. Experimenting with different colors and techniques means that no two creations need ever be the same and provides an exciting blank canvas for creativity.
- Third, Start Crafting
Once you have chosen your stencil, paint, and tool, it’s time to get to work! Here are your steps to get started:
- Make sure your surface and stencil are completely dry before starting—any moisture will cause the paint to bleed underneath the stencil's edges.
- Place the Mesh Stencil onto your surface and secure it firmly in place by burnishing (rub all over in circles) so there are no gaps or bubbles between the stencil and the surface. Push the stencil very firmly onto the surface around small details especially so all adhesive is properly stuck to the surface. Any sections not properly adhered could possibly bleed. TIP: Add some painter's tape around the edges of your stencil to avoid painting outside the lines and onto the surface where you don't want any paint.
- Use a ChalkArt Spreader, Squeegee, Artist Brush, or Foam Dome Brush dipped in paint and gently smooth over each design, pushing the paint through the mesh, until all areas are filled in properly. Avoid using too much paint as an over abundance of medium will cause bleeding. A minimal amount goes a long way, so start small and add more as needed. Dab or scrape lightly so that the paint goes through the mesh, but you're not forcing too much that could seep underneath the edges of the design. TIP: Work fast to cover your stencil with paint within 5 minutes or the medium will dry in the mesh and ruin the stencil.
- Now for the best part! Once the design is painted and the paint is still wet, gently pull the Mesh Stencil straight up away from the surface at a 90 degree angle and watch your design come to life!
- Be sure to immediately wash the stencil in warm water, rubbing the non adhesive side in circular motions with your fingertips until the mesh is clear of paint (you may also use a sea wool sponge to gently rub out the paint on the non adhesive side of the stencil). All our mediums are designed to pair with Mesh Stencils, but if the paint is not immediately washed out with your fingertips, you may place it in a warm water bath to loosen any paint. If you are not able to immediately wash the stencil, then you may go ahead and place it in a warm water bath until ready to wash (this is the best way to clean stencils if you're pressed for time or need to finish painting elsewhere).
NOTE: Surfaces such as paper, cardboard, wood, and other smooth surfaces will give a crisper transfer than surfaces such as fabrics, canvas, grainy wood, etc. If you're working with a textured surface, we recommend painting a layer of One Step Paint on the surface before applying the stencil design. This will allow for a smoother surface and cleaner design.

How to Use Mesh Stencils on Different Surfaces: Fabric, Wood, and More
Fabric
Gel Art Ink is a permanent fabric medium that allows crafters of all ages and skill levels to create beautiful designs on any garment or fabric surface. Our patented mesh stencils make it easy to achieve professional-looking results with just a few simple steps (outlined above). To complete your creation, allow the design to dry completely for a few hours before heat setting with an iron set at 250 degrees (no steam!). Use parchment paper to keep the medium from sticking to your iron as you rub continuously for 3-5 minutes. Now you’re ready to enjoy your custom art!
One Step Paint is also an excellent option for fabrics. Just dilute the paint with 15-20% water, mist your fabric, and start painting! Once dry, you may also use a stencil on top of the One Step to add a beautiful design. Finish up with Light Wax to protect. You'll be amazed at how easy it is to transform fabrics with paint!


Wood
A Makers' Studio ChalkArt is all about versatility. Use this water-based chalk paste to easily customize your furniture, tabletop decor, glass, and nearly any other non-porous surface. After drying for just 15 minutes, you will have a beautiful piece of lettering or artwork that will leave people wondering, "how did they do it?" Change up your design later by simply cleaning your piece with a wet rag and creating something brand new! Pair with our uniquely detailed (and patented!) mesh decorative stencils to create truly professional designs on almost any surface over and over again!


Final Thoughts on How to Use Stencils
There is no doubt that mesh stencils add a fun and unique element to your DIY projects. Their versatility allows you to get creative in so many different ways, and the results are always stunning. Whether you are a beginner or an experienced hand at art, the results you can achieve with mesh stencils will be sure to impress. With this guide and some practice, soon enough you’ll be enjoying hassle-free crafting with these amazing tools! So don’t wait, try out mesh stencils on your next project and join the ranks of experienced artisans who choose them every time. We guarantee that you won’t regret it; create something that you can enjoy for years to come!
Check out all of the A Makers' Studio Mesh Stencil designs below:
Want to learn more about crafting with Mesh Stencils and A Makers' Studio products? Check out these helpful articles:
What are Stencils?
How to Paint with Stencils
Best Stencils for Painting
How to Clean Stencils
How to Make Stencil Art

How to Paint with Stencils Without Bleeding | Tips for Painting with Stencils
How to Paint With Stencils Without Bleeding: Tips for Painting With Stencils Like a Pro
If you’re looking for an easy and rewarding DIY project, look no further than painting with stencils. Not only is it a fun activity that anyone can do at home, but it also produces beautiful results if done correctly. But painting with stencils is not without its challenges. One of the biggest problems that novice painters face is paint bleeding under the stencil, which can lead to smudged edges and sloppy results. Fortunately, there are some simple steps you can take to ensure your stenciled masterpiece looks perfect every time! Read on for our tips on how to paint with stencils without bleeding.
Never heard of Mesh Stencils?
These thoughtfully designed and patented Tri Mesh adhesive stencils can be combined with a variety of surfaces to create endlessly customized DIY home décor.
What you'll love:
- Create beautiful stenciled words and imagery for any occasion!
- Use over and over again on almost any surface and with almost any finish, from Rescue Restore Paint to ChalkArt and even gilding.
- New and improved design features stronger adhesive, easier cleaning, and simpler transfer between different surfaces.
Grab your favorite stencil designs and start adding artistic elements to your furniture and accents without any drawing or painting skills!
Check out all the A Makers' Studio Mesh Stencil designs here!

What Kind of Paint to Use With Stencils: All Your Options Explained
The first step in successful stenciling is choosing the right kind of paint. A Makers' Studio mediums are specifically designed to be used with our Mesh Stencil technology. Our paints are ideal for creating crisp lines and edges when painting with stencils as well as being designed for easy clean up so you can keep using your stencils time and time again! For best results, choose a high-quality paint like the ones offered at A Makers' Studio - even our Gilding Size and Etching Cream can be used with our Mesh Stencils very easily!
Here is a list of all our mediums and what they are used for:
ChalkArt - This is a non-permanent medium that can be used on many surfaces such as paper, wood, ceramic, glass, fabric, and more. It can be wiped off hard surfaces for changeable designs!
Gel Art Ink - This is a permanent medium best for soft surfaces such as paper, apparel, upholstery, and fabrics. It can also be used on wood, metal, and plastic. It needs to be heat set on the soft surfaces.
Ceramic Paint - No baking needed, this paint lays a rich permanent color on ceramic and glass surfaces. Food and oven safe!
One Step Paint - Our most versatile paint which can be used on basically any surface including wood, glass, resin, melamine, Formica, concrete, iron, and stone.
Etching Cream - Create beautiful custom detailing on any glass surface. It actually etches into the glass for a permanent design.
Gilding Size - The glue used with Gold, Silver, and Copper Leaf.
Shop all of the A Makers' Studio mediums here as well a our entire Mesh Stencil collection.
How to Paint With Stencils Without Bleeding: Step-by-Step Guide
Once you have chosen your paint, it’s time to get to work! Here are some tips and tricks from our experts at A Makers' Studio on how to get started:
- Make sure your surface and stencil are completely dry before starting—any moisture will cause the paint to bleed underneath the stencil's edges.
- Place the Mesh Stencil onto your surface and secure it firmly in place by burnishing (rub all over in circles) so there are no gaps or bubbles between the stencil and the surface. Push the stencil very firmly onto the surface around small details especially so all adhesive is properly stuck to the surface. Any sections not properly adhered could possibly bleed. TIP: Add some painter's tape around the edges of your stencil to avoid painting outside the lines and onto the surface where you don't want any paint.
- Use a ChalkArt Spreader, Squeegee, Artist Brush, or Foam Dome Brush dipped in paint and gently smooth over each design, pushing the paint through the mesh, until all areas are filled in properly. Avoid using too much paint as an over abundance of medium will cause bleeding. A minimal amount goes a long way, so start small and add more as needed. Dab or scrape lightly so that the paint goes through the mesh, but you're not forcing too much that could seep underneath the edges of the design. TIP: Work fast to cover your stencil with paint within 5 minutes or the medium will dry in the mesh and ruin the stencil.
- Now for the best part! Once the design is painted and the paint is still wet, gently pull the Mesh Stencil straight up away from the surface at a 90 degree angle and watch your design come to life!
- Be sure to immediately wash the stencil in warm water, rubbing the non adhesive side in circular motions with your fingertips until the mesh is clear of paint (you may also use a sea wool sponge to gently rub out the paint on the non adhesive side of the stencil). All our mediums are designed to pair with Mesh Stencils, but if the paint is not immediately washed out with your fingertips, you may place it in a warm water bath to loosen any paint. If you are not able to immediately wash the stencil, then you may go ahead and place it in a warm water bath until ready to wash (this is the best way to clean stencils if you're pressed for time or need to finish painting elsewhere).
NOTE: Surfaces such as paper, cardboard, wood, and other smooth surfaces will give a crisper transfer than surfaces such as fabrics, canvas, grainy wood, etc. If you're working with a textured surface, we recommend painting a layer of One Step Paint on the surface before applying the stencil design. This will allow for a smoother surface and cleaner design.


First, Get the Right Stencils at A Makers' Studio
Take a look at some of these most popular themed Mesh Stencils to get started making your very own projects!
Grab Other Necessary Tools & Supplies
Before getting started on your project, make sure you have all the necessary tools and supplies. You’ll need a stencil, paintbrush or Squeegee depending on the size of your project, some painter’s tape (optional), a drop cloth or newspaper (to protect the surface beneath your project) and your chosen paint or medium in colors that match your room’s décor. You may also want to grab some small sponges or q-tips for cleaning up any mistakes along the way.
Prep the Surface Before You Start Painting With Stencils
The key to successful painting with a stencil is preparing your surface properly before starting. Make sure that your surface area is clean and free of any dirt or dust that could interfere with the adhesive on your stencil. Clean Slate is an amazing product that will clean off any grease, dirt, oils, or waxes that you cannot see and that live on the surface.
Do You Pull Stencil Off Wet or Dry?
When it comes time to pull off the stencil after painting with it, you should always pull of when the medium is still wet! The hazard of not working fast enough is that the paint can dry in the mesh of the stencil. Also, after removing the stencil, you may correct any accidental smudged with a q-tip while the paint is still wet.

Additional Tips for Painting With Stencils Like a Pro
When it comes down to actually painting with a stencil there are several tips that can help make sure everything goes smoothly! Always start in an inconspicuous corner when beginning each design element so that if anything goes wrong, no one will see it! Also make sure to use light pressure when applying paint over the edges of each stencil design—this will help ensure that none of the details get smudged or blurred out as you paint! Finally, you may add a protective coat over your design using Matte Sealer. Once your design is fully dried, you may paint a coat over the entire design or surface (use a foam roller gently if applying over ChalkArt). The sealer will dry completely clear and make your design durable to last for years to come! When working with smaller details make sure not too overload your brush with too much paint at once - this can cause bleeding underneath the stencil even if adhered well to your surface. Additionally try dabbing instead of brushing if possible - this helps keep things looking neat around corners and tight spaces!

Painting with stencils can be an incredibly rewarding DIY project if done correctly – but many people struggle with their projects due to issues such as bleeding or smudging around the edges of their designs due to improper techniques or materials used during application. Hopefully these tips will help make your next painting project go smoothly! Just remember: always use high quality materials like those offered at A Makers' Studio, take extra care when applying multiple layers of paint, allow each layer adequate drying time before adding another layer or color, and don’t rush through any step of the process! Good luck!
See why other crafters love our Mesh Stencils and the variety of projects that can be made with them. Join our community on the Crafting a Beautiful Life Facebook page to share project photos, get inspired, and get tips and tricks from fellow crafters.
We can't wait to see how you start Crafting Your Beautiful Life!

Best Stencils for Painting Walls, Rocks, Furniture, & More
How to Find the Best Stencils for Painting
Are you looking for the best stencils for painting that will help you create your own unique DIY projects? From rock painting to walls and furniture, finding the perfect design is essential. That’s why A Makers' Studio offers an array of Mesh Stencils – so that you can find the perfect design for whatever project you have in mind. Let’s take a closer look at how to find the best stencils for painting!
Never heard of Mesh Stencils?
These thoughtfully designed and patented Tri Mesh adhesive stencils can be combined with a variety of surfaces to create endlessly customized DIY home décor.
What you'll love:
- Create beautiful stenciled words and imagery for any occasion!
- Use over and over again on almost any surface and with almost any finish, from Rescue Restore Paint to ChalkArt and even gilding.
- New and improved design features stronger adhesive, easier cleaning, and simpler transfer between different surfaces.
Grab your favorite stencil designs and start adding artistic elements to your furniture and accents without any drawing or painting skills!
Check out all the A Makers' Studio Mesh Stencil designs here!

What to Look for When Choosing Stencils for Painting
When it comes to choosing the best stencils for painting, there are some key factors to consider.
- First and foremost, make sure you choose a size that is appropriate for your project. You want something large enough so that it can cover a wide area but not too big that it becomes difficult to maneuver. What surface are you putting the design on? Measure the area you want to cover and make sure to pick a stencil that fits the space. A Makers' Studio offers stencils from sizes 5.5x8.5 to as big as 18x24.
- Next, pay attention to the details of each design. Does your chosen design offer detailed lines or more abstract shapes?
- Finally, think about paint color options – do you prefer bold designs or subtle ones? Will you be able to paint on multiple colors over a particular design based on your vision?
The Benefits of Using Mesh Stencils For Painting
Mesh Stencils are becoming increasingly popular because they provide several benefits over traditional paper-based stencils. Foremost among these are their superior durability and flexibility; Mesh Stencil designs won't tear or snag like paper-based ones can, making them ideal if your project requires intricate detailing or complex curves. Additionally, mesh can be reused multiple times without losing its shape or integrity – so even if you make a mistake on one project, you don't have to worry about throwing out the entire design! Finally, because mesh is made from plastic rather than paper, it doesn't absorb any paint or ink as easily as paper does – meaning that your finished product won't be smudged or smeared due to accidental spillage.
Finding Quality Mesh Stencils Online
At A Makers' Studio we understand how important quality products are when creating DIY projects. That’s why we only offer premium quality Mesh Stencil designs – all created by our talented team of designers! We also have an ever-growing selection of designs available – from bold statement pieces to subtle decorations and everything in between! Find your favorite designs and check out our latest releases here.

What Separates the Best Stencils for Painting From the Rest?
When you’re searching for the best stencils for painting, there are certain factors that will set them apart from their lesser counterparts.
These include:
- Quality Materials: The most important factor when it comes to stencils is that they are made of quality materials that won’t wear down quickly over time and can withstand multiple uses. The best stencils should be made of durable material so that they don't tear easily or lose their shape after multiple uses.
- Ease of Use: The next thing to consider when shopping for stencils is how easy they are to use. Look for ones with smooth edges and flexible design so that it's easier to get a clean, crisp line every time. Additionally, if possible, look for sets that come with instructions on how to properly use them.
- Reusability: You should also look for sets of stencils that can be reused multiple times without losing its shape or coloration over time. This means avoiding cheap paper or cardboard varieties, as these tend to lose their form after just a few uses.
- Fun Designs: Of course, one of the most important aspects of any DIY project is making sure it looks great! So when selecting your set of stencils, make sure you pick ones with fun designs and patterns so that your finished project looks like something straight out of a magazine!


What are the Best Stencils for Painting?
At A Makers' Studio, we offer top-of-the-line reusable stencil sets in a variety of sizes and designs – perfect for any home décor or craft project! We offer a variety of stencils – giving you plenty of options no matter what kind of space or surface you’re working with. We have something for everyone – whether you’re looking for something simple and elegant or something more intricate and colorful – we have designs you will adore. Plus, our reusable tri-mesh technology ensures they last longer than traditional paper or cardboard versions while still being easy enough to maneuver around those hard-to-reach corners!
Why Our Stencils Are So Amazing
Not only do our high-quality Mesh Stencils look amazing but they also provide an extra level convenience thanks to their reusability factor! Whether you're looking to paint walls, rocks, furniture, clothes, shoes, or whatever surface - our tri mesh technology means you can keep coming back again and again without fear of damaging them! Plus our selection includes hundreds of unique designs and sizes so if one collection doesn't quite fit your needs then feel free try another until you find the perfect match!
No matter what type of DIY project you're undertaking - whether it's wall decorating or rock painting - having access to quality tools and materials is essential. With A Makers' Studio's selection of Mesh Stencil designs - finding the perfect piece has never been easier! Thanks to our superior quality materials and detailed craftsmanship - every purchase comes with guaranteed satisfaction! So don't wait any longer - start browsing today and discover what makes us the crafter's go-to source for all things DIY!
Take a look at some of these most popular themed Mesh Stencils to get started making your very own projects!
- Animal Stencils
- Dog Stencils
- Holiday Stencils
- Christmas Stencils
- Thanksgiving Stencils
- Valentine's Day Stencils
- Halloween Stencils
See why other crafters love our Mesh Stencils and the variety of projects that can be made with them. Join our community on the Crafting a Beautiful Life Facebook page to share project photos, get inspired, and get tips and tricks from fellow crafters.
We can't wait to see how you start Crafting Your Beautiful Life!

How to Clean Stencils | Why Cleaning Stencils is so Important
How to Clean Stencils: Tips for Keeping Them in Tip-Top Shape
If you're a maker or artist, chances are you've used stencils at some point. While they make it easy to create intricate designs with sharp lines and crisp edges, the one downside is that they need to be cleaned after use. But how do you clean stencils? We’ll talk about why cleaning stencils after use is so important in the first place and give you tips for washing yours. Let’s start by talking about why it's necessary to clean them.
Never heard of Mesh Stencils?
These thoughtfully designed and patented Tri Mesh adhesive stencils can be combined with a variety of surfaces to create endlessly customized DIY home décor.
What you'll love:
- Create beautiful stenciled words and imagery for any occasion!
- Use over and over again on almost any surface and with almost any finish, from Rescue Restore Paint to ChalkArt and even gilding.
- New and improved design features stronger adhesive, easier cleaning, and simpler transfer between different surfaces.
Grab your favorite stencil designs and start adding artistic elements to your furniture and accents without any drawing or painting skills!
Check out all the A Makers' Studio Mesh Stencil designs here!

Do You Have To Clean Stencils After Use?
Yes! Cleaning your stencils after every use is essential for keeping them in good condition and making sure they last as long as possible. Without proper cleaning, paint, ink, or other materials can dry on the surface of your stencil, which will make it harder to remove and can result in damage over time. Additionally, dirt and debris can build up on the surface of your stencil over time if it isn't properly cleaned after each use. This can lead to an uneven application when painting or drawing with your stencil and affect the accuracy of your image. Mesh Stencils are designed to give a crisp, clean design with intricate details, so cleaning your stencils is important to maintain that design quality.
Why Do You Need to Wash Stencils?
When it comes to cleaning your stencils, there are a few different methods you can use depending on how much time you have and what mediums you're using. For example, if you don't have time to wash your stencils immediately, then submerge them in a warm water bath to keep the paint from drying in the mesh. If you're able to clean your stencil immediately – then simply running it under warm water and messaging with your fingers should do the trick. Once all the residue has been removed from both sides of the stencil, be sure to lay it flat until it's completely dry before storing it away again. For ChalkArt, Gel Art Ink, and Ceramic Paints, using your hands and lukewarm water should do the trick.
For more heavy-duty applications such as One Step Paint or Gilding Size that may require more intense scrubbing action, try using a soft (wetted) sea wool sponge along with warm water and mild dish soap (such as Dawn) to remove any stuck-on residue without damaging the surface of the stencil itself. Just be sure not to press too hard and only scrub on the non sticky side so that you don't scratch any part of the design or compromise the adhesive of the stencil!
How to Clean Mesh Stencils
Here's everything you need to know step by step:
- While using a Mesh Stencil, you will want to complete your painting within a couple of minutes in order to prevent any paint from drying in the mesh of the stencil.
- Once you're done painting, carefully peel the stencil from your surface while the paint is still wet and immediately wash the stencil in warm water, rubbing the non adhesive side in circular motions with your fingertips until the mesh is clear of paint (you may also use a sea wool sponge to gently rub out the paint on the non adhesive side of the stencil). All our mediums are designed to pair with Mesh Stencils, but if the paint is not immediately washed out with your fingertips, you may place it in a warm water bath to loosen any paint. If you are not able to immediately wash the stencil, then you may go ahead and place it in a warm water bath until ready to wash (this is the best way to clean stencils if you're pressed for time or need to finish painting elsewhere).
- Once the paint is fully removed from the mesh, place your stencil adhesive side up to air dry. Do not ever lay adhesive side down to dry.
- After the stencil dries it can be pressed lightly back onto the white card stock surface it came on and returned to the plastic sleeve.


Additional Tips for Caring for Stencils
Beyond cleaning, there are other things you should keep in mind when caring for your stencil collection: always store them flat instead of folded; never leave them out in direct sunlight; avoid leaving them exposed outdoors; make sure they're completely dry before putting them away; and wash hands thoroughly before handling them (this helps preserve their accuracy). Following these steps will ensure that your collection stays neat and tidy while also keeping the designs clean and accurate over time!
Closing Thoughts on How to Clean Stencils
Tending our tools is part of being an artist—and taking care of our supplies means our art looks better every time we create something new! For this reason, proper cleaning techniques should always form part of our creative practice - after all, well-cared-for supplies mean better results every single time! Keeping our tools in good condition is key when it comes to creating beautiful artwork with maximum accuracy every time—and this goes double for art supplies like stencil collections. Taking a few moments to properly wash and dry your tools will save you time (and money) in future! With these tips for how to clean stencils in mind, we hope that you feel confident enough now to keep yours looking their best even after multiple uses!
Happy creating!

Want to see the process of cleaning stencils? Watch this short video!
Take a look at some of these most popular themed Mesh Stencils to get started making your very own projects!
Want to Enjoy the Bragging Rights? Join our community on the Crafting a Beautiful Life Facebook page to share project photos, get inspired, and get tips and tricks from fellow crafters.
We can't wait to see how you start Crafting Your Beautiful Life!

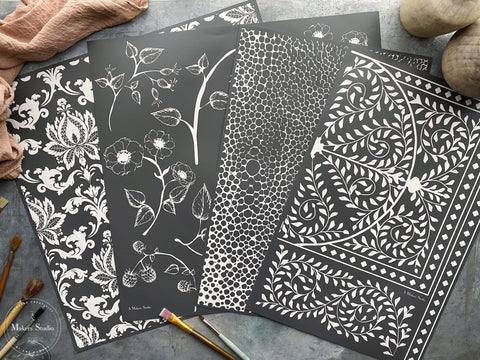
What are Stencils Used for | What are Stencils Made of
A Beginner’s Guide to Stencils: Uses, Materials, and Tips
Stencils are a versatile tool used in many different craft projects. But what exactly are stencils? What are they made of? And how can you use them to create beautiful designs? In this beginner’s guide to stencils, we’ll answer all these questions and more. Keep reading to learn all about the uses, materials, and tips for getting started with stencils.
What Are Stencils?
A stencil is a template that you use to trace or transfer an image onto another surface. Stencils come in many shapes and sizes and can be used for a variety of different projects. They are great for creating repeat patterns on walls, fabrics, furniture, glasswork, and much more!
A Makers' Studio Mesh Stencils are thoughtfully designed and patented Tri Mesh adhesive stencils which can be combined with a variety of surfaces to create endlessly customized DIY home décor.
What you'll love:
- Create beautiful stenciled words and imagery for any occasion!
- Use over and over again on almost any surface and with almost any finish, from One Step Paint to ChalkArt and even gilding.
- New and improved design features stronger adhesive, easier cleaning, and simpler transfer between different surfaces.
Grab your favorite stencil designs and start adding artistic elements to your furniture and accents without any drawing or painting skills!
Check out all the A Makers' Studio Mesh Stencil designs here!

What Are Stencils Used For?
Stencils have many uses, from art projects to decorating your home. Here are some of the most popular uses for stencils:
- Wall decoration – Use stencils to paint unique designs on your walls! You can also use them to create wallpaper-like effects.
- Furniture painting – Add some personality to your furniture by using stencil patterns when painting or staining it.
- Fabric printing – Use fabric paint and a stencil to design custom t-shirts or bags as gifts or decorations.
- Glass etching – Etch intricate patterns into glassware such as drinking glasses or vases with A Makers' Studio Mesh Stencils and Etching Cream
- Craft projects – Create one-of-a-kind paper crafts, décor, and so much more with the help of a few simple tools and some creativity!
What Are Stencils Made Of?
Most commonly, you will find plastic material used for making stencil templates. These types of stencils are fully cut out for tracing, painting, and other techniques. However, the A Makers' Studio Mesh Stencils are made from mesh fabric which has recently become popular among crafters due its ability to hold finer details which allow for greater accuracy when painting intricate designs. At A Makers' Studio we specialize in high quality tri mesh technology because it is more durable than plastic stencil material and can be reused multiple times without losing its shape or accuracy over time. The mesh also allows the finest and most intricate details when applying to a project with paint or other mediums. That makes it perfect for DIYers who want precise results that last longer!

Tips For Getting Started With Stencils
If you’re just starting out crafting with stencils here are some helpful tips:
- Choose the right stencil – Consider which stencil will best suit your project before investing in any supplies; plastic open cut stencils might be better suited if you need something for tracing or drawing, whereas mesh may be better if you need something reusable and made for intricate painted designs.
- Cut carefully – Be sure that when cutting out the design from your chosen stencil that it is cut accurately so that you have enough room to paint around the edges (you may always use painter's tape around
- Clean up quickly – Once you peel the stencil from your painted design, remember to immediately clean off any residue left behind as soon as possible so that it does not dry onto the mesh itself which could make future use difficult (or impossible!). View our guidelines for stencil care here.
- Practice first – If this is your first time using a particular type of template then practice on scrap paper before trying out your new design on any expensive surfaces; this way you can get used to how the process works without having too much at stake!


Get Quality Stencils at A Makers' Studio
Now that you know all about what they are and what they can do - why not try out making something yourself? At A Makers' Studio we provide quality mesh fabric stencils perfect for starting up on any craft project - no matter how small or large! Plus our stencils come in various themes so there's always something new waiting around every corner!
Whether you’re an experienced crafter looking for new materials or someone just getting started - this beginner guide should help make crafting that much easier. Remember though - practice makes perfect so don't forget to take advantage of the opportunity to try out your designs on paper before investing starting your project! Get creative today with our top quality Mesh Stencils at A Makers' Studio!
Take a look at some of these most popular themed Mesh Stencils to get started making your very own projects!
See why other crafters love our Mesh Stencils and the variety of projects that can be made with them. Join our community on the Crafting a Beautiful Life Facebook page to share project photos, get inspired, and get tips and tricks from fellow crafters.
We can't wait to see how you start Crafting Your Beautiful Life!

How to Make Stencil Art Easily | A Makers' Studio
In this quick guide, you’ll learn how to make stencil art easily. Your DIY projects are about to get more simple and more fun when you discover this new form of art!
The A Makers' Studio Mesh Stencils make it extremely easy to create stencil art designs with no skill or drawing experience needed. Check out our collection of Mesh Stencils!
Never heard of stencil art? Let us answer your questions and show you how to start!

What Exactly is Stencil Art?
Stencil art is the process of crafting art by using mediums such as paints with the method of stenciling. Never heard of stenciling or Mesh Stencils? The A Makers' Studio Mesh Stencils are thoughtfully designed and patented with Tri Mesh adhesive technology that can be combined with a variety of surfaces to create endlessly customized DIY home décor. You don't need any painting skills or crafting experience to be able to use them and create finely detailed Stencil art.
What you'll love:
- Create beautiful stenciled words and imagery for any occasion!
- Use over and over again on almost any surface and with almost any finish, from One Step Paint to ChalkArt and even gilding.
- New and improved design features stronger adhesive, easier cleaning, and simpler transfer between different surfaces.
Grab your favorite stencil designs and start adding artistic elements to your furniture and accents without any drawing or painting skills!
Why You Should Learn Stencil Art
Making stencil art is extremely easy. If you're not an experienced crafter or don't have time to devote to crafting, then you will love the technique of making stencil art. If you've never done this technique before using Mesh Stencils, then you will be amazed at how easy and fun it is. You don't need to invest a lot of time before being able to make your own stencil art crafts on almost any surface.
What You Need for Making Stencil Art
All you need to create your own stencil art is the following:
- Mesh Stencil of choice - View Mesh Stencils
- Paint - like our Gel Art Inks or ChalkArt
- Tool - like our Artist Brush, ChalkArt Spreader, or Squeegees
It's never been easier to stencil than with our tri-mesh technology which allows you to create fine details and designs with ease and no experience needed!

How to Make Stencil Art: Step-by-Step Guide to Creating Your First Project
Step 1
Gather Your Supplies

Choose your Mesh Stencil based on what you want your stencil art to look like and what surface you're using. We used the following products for this specific project:
- World Map - Mesh Stencil 18x12
- Hush Your Mouth (blue) - Gel Art Ink
- Can't Never Could (black) - Gel Art Ink
- Metallic Copper - Gel Art Ink
- Angled Squeegee
- Artist Brush
- 18x12 Art Paper
Want to do this same World Map Project? Get all the products in one bundle right here!
Step 2
Place Your Stencil

With your 18x12 paper or chosen surface ready, take your chosen Mesh Stencil, remove it from the clear plastic package, and then remove the white backing. Place your Stencil onto the paper or surface, making sure it is centered and rubbed down firmly with no gaps or bubbles. It is easy to lift the Stencil up to reposition if needed!
Step 3
Paint

Using a ChalkArt Spreader, Squeegee, or Artist Brush, apply the Hush Your Mouth (blue) Gel Art Ink all over the Stencil. You will smooth the paint over the design, pushing the paint through the mesh of the Stencil. Gel Art Ink goes a long way, so you won't need much to complete your design. Start with a little Gel Art Ink and add as needed.
Step 4
Enjoy!

Once the Stencil is completely covered with Ink, pull the stencil carefully away from the paper or surface to reveal the intricate design you've just made!
TIP: Immediately wash your Stencil under warm water, massaging the paint out of the mesh in circular motions with your fingertips. Once all of the paint is out of the mesh, place adhesive side up to air dry. Once fully dry, reattach the Stencil to the white backing and place in the clear packaging it came with to store for future use!

BONUS: Want to take your Stencil art to the next level? Antique your surface with the following steps before placing your Mesh Stencil design.
1. In a container, mix a small amount of Can't Never Could (black) Gel Art Ink and Metallic Copper Gel Art Ink with a small amount of water to create a custom watercolor.

2. Using the Artist Brush, apply the mixed watercolor to your paper as desired. You may highlight certain areas or make it even along the page. This is an antiqued look and the Stencil design will be going on top, so don't worry about it being perfect!

3. If desired, take the Artist Brush and use it to flick paint onto the paper creating speckles and dots to create a more naturally aged look.

4. Let the paper dry completely before adding the Mesh Stencil design and finishing the Stencil art.

Wrapping Up Our Guide on How to Make Stencil Art
The possibilities are endless using this Stencil art technique. You can make any design imaginable on almost any surface. You can keep it simple, or you can add a few steps and make a more complex piece of Stencil art.
Check out what else we created using the World Map Mesh Stencil!


Take a look at some of these most popular themed Mesh Stencils to get started making your very own Stencil art!
Want to Enjoy the Bragging Rights? Join our community on the Crafting a Beautiful Life Facebook page to share project photos, get inspired, and get tips and tricks from fellow crafters.
We can't wait to see how you start Crafting Your Beautiful Life!

Valentine's Treat Bags
The holiday of love is right around the corner, and we have the cutest craft for those sweethearts in your life! Join us as we craft some Valentine's treat bags using just a few supplies.
Products needed:
- Your favorite Valentine's Mesh Stencil (we used Love Love Love)
- Bless His Heart - Gel Art Ink (red)
- Pretty as a Picture - Gel Art Ink (pink)
- Can't Never Could - Gel Art Ink (black)
- Artist Brush
- ChalkArt Spreader
Other supplies:
- Small canvas or cloth bags
- Small container
- Water

Step 1
Add a small amount of the red and pink Gel Art Ink to separate containers and add 4-5 drops of water to each. Mix with the Artist Brush.

Step 2
Take the Artist Brush and paint the bottom most section of the canvas or cloth bag using the red Bless His Heart Gel Art Ink. You may be as detailed or imprecise as you'd like!

Now use the pink Pretty as a Picture Gel Art Ink to paint the top part of the bag leaving a space in the middle between the pink and red.

Now that you've painted the red and pink sections, add a drop of Bless His Heart (red) to the container of Pretty as a Picture (pink) and mix well to create a color between the two shades. Paint the blank middle of the bag, blending the sections desired to create an ombre effect.

Step 3
Take the Love Love Love Mesh Stencil (or your chosen design), and cut out the part you'd like to use on the bag. Peel the black mesh off of the white backing and place on the bag in the desired spot. Be sure to burnish (rub) the stencil well so it adheres to the bag in all areas.

Step 4
Using the ChalkArt Spreader, apply the Can't Never Could (black) Gel Art Ink in a sweeping downward motion, pushing the ink through the mesh. Be sure to keep your ink on top of the stencil.
Tip: You may place painter's tape around the adhered stencil to keep from going outside the lines!

Peel away the the stencil to reveal your detailed Valentine design!
Tip: Be sure to immediately wash your Mesh Stencils, rubbing the ink out of the mesh under running water and leaving to air dry sticky side up!

Repeat as desired for each of your bags. Get creative and think outside the box!

Finally
Stuff with candy or fun little notes, and enjoy handing out your custom treat bags to all your Valentines!

Check out all of our Valentine's and love themed Mesh Stencils and get to crafting here!
Want to watch the video? Amy and Michelle made their own Valentine's bags and you can follow along with them!
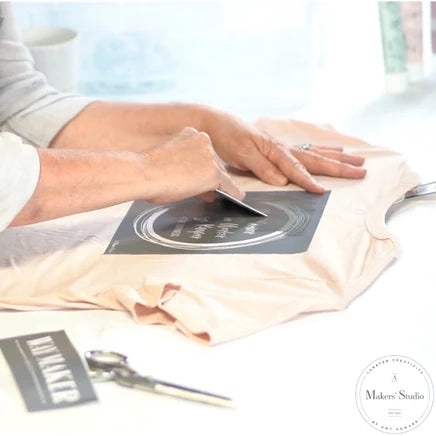
DIY Inspirational Shirt | Using Mesh Stencils
Imagine inspiring someone's life to be better just by going about your day with a great message printed on what you're wearing.
With a few tools from A Maker's Studio, you can do exactly that and turn simple, everyday shirts into joyful and inspiring pieces for everyone to see.
STEP 1: PICK A STENCIL AND A COLOR

Choose a reusable mesh stencil design that you like and a Gel Art Ink color to match.
For this project, we are going to use the Way Maker Mesh Stencil and Hold Your Horses - Gel Art Ink.
STEP 2: PREP YOUR SHIRT
Put a cardboard on the inside of the shirt you are working with.This will help make sure that the paint you are applying on either side of the shirt doesn’t bleed through the other.
STEP 3: APPLY THE STENCIL
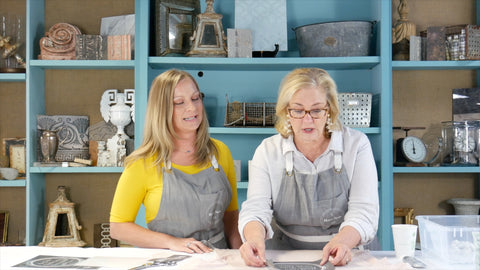
Remove its backing to expose the stencil's adhesive side and carefully place it on your shirt.
STEP 4: COLOR IT UP

Squirt some Gel Art Ink along one edge of your spreader. Hold your spreader at a 45-degree angle and spread the ink evenly over your stencil. Make sure that you are pushing the Gel Art Ink adequately through the mesh and onto the shirt.
STEP 5: LET IT DRY

When you're done, gently peel the stencil off and allow the ink on your shirt to air dry for at least two hours.
STEP 6: WASH YOUR STENCIL

Don’t let the ink dry on your stencil. Wash it right after use.
Place your stencil in water and use a clean rag to help wipe the ink off of it.
Then, take your stencil out of the water and lay it on a flat surface with the adhesive side up. Leave the stencil to air dry.
STEP 6: IRON THE PRINT

Place a lint-free rag on top of your design. Go over the rag with an iron for about 5 minutes. The heat is going to help the ink to set.
SOME REMINDERS:
If you get some of the Gel Art Ink on other parts of the shirt where you don't want it, wipe it off with a clean rag before it starts to set.After using your newly designed shirt, turn it inside out and wash it with cool water. Keep it out of the dryer to prevent the design from fading quickly.
If you need to use a dryer, use the cool setting and keep the shirt turned inside out.
Start spreading joy and inspiration today using these products:
Mesh Stencil - Way Maker
https://www.shopamakers.com/products/mesh-stencil-way-maker-8-5-x-11
Gel Art Ink - Hold Your Horses
https://www.shopamakers.com/products/gel-art-ink-hold-your-horses