Inside A Makers' Studio
Inside A Makers' Studio

Create Enchanted Mushroom-Themed Decor
Create Your Own Mushroom-Themed Decor with Our New Stencil
We're thrilled to bring you a whimsical project that will add a touch of nature to your home decor. In our latest Maker Monday session, Amy showcases the versatile Mushroom Stencil by demonstrating how it can be used across multiple creative projects.
From decorating wooden boards to adding charm to pillows and even personalizing tote bags, Amy explores a variety of ways to bring the beauty of mushrooms into your home. Watch the full tutorial in our Maker Monday video below and follow along with our step-by-step guide to craft your own mushroom-themed decor.
What You’ll Need:
To get started on your mushroom stencil project, gather the following supplies:
- Mushroom Stencil (Available in our shop)
- ChalkArt Paint
- Gel Art Ink for finer details
- ChalkArt Spreader or brush for applying paint
- Stencil Brushes
- Surface to Decorate (e.g., cutting board, fabric, canvas, tote bag)
- Painter's Tape (to secure the stencil)
- Water and Cloth (for cleanup)
Step-by-Step Instructions:
Step 1: Prepare Your Workspace
Start by setting up a clean and organized workspace. Lay down a protective covering if necessary, and gather all your supplies within reach. This will help you stay focused and make the project go smoothly.
Step 2: Secure the Stencil
Position the Stencil: Place the mushroom stencil on your chosen surface. Amy demonstrates how this can be applied to items like wooden boards, pillows, and tote bags.
Tape the Stencil: Use painter's tape to secure the stencil in place. This ensures it won’t move while you’re applying paint.
Step 3: Apply ChalkArt Paint
Choose Your Colors: Select the ChalkArt paint colors you want to use for your mushroom design. Amy used a mix of earthy tones and vibrant hues to bring the mushrooms to life.
Load the Brush: Dip a stencil brush or ChalkArt spreader into the paint. Dab off any excess on a paper towel to prevent bleeding.
Apply the Paint: Gently dab or spread the paint over the stencil, covering all the open areas. Use light, even strokes to avoid pushing paint under the stencil.
Step 4: Add Gel Art Ink Details
Switch to Gel Art Ink: For finer details, use Gel Art Ink. This medium is great for adding intricate touches and enhancing the design.
Apply Ink: Use a small brush or a detail applicator to carefully add the ink over the stencil areas. This can help highlight features like mushroom gills or stems.
Step 5: Remove the Stencil
Carefully Peel: Once you’ve applied all your colors, carefully remove the stencil. Lift it straight up to avoid smudging the design.
Clean Up: Immediately wash the stencil with water to remove any paint or ink. This keeps it in good condition for future projects.
Step 6: Final Touches
Dry and Set: Allow your design to dry completely. If you’re working on fabric, you may want to heat set the paint with an iron to ensure durability.
Display Your Work: Your mushroom-themed decor is ready to be admired! Place it in your kitchen, living room, or give it as a thoughtful handmade gift.
Tips and Tricks:
- Color Combinations: Experiment with different color palettes to match your home decor or the season.
- Layering: Try layering multiple stencils for a more complex design or to add background elements.
- Surface Variety: This stencil works well on a variety of surfaces, so feel free to get creative with where you apply it.
Share Your Creation!
We can’t wait to see your mushroom-themed masterpieces! Share your photos with us on social media using the hashtag #AMakersStudio. You might get featured on our page!
Shop the Stencil ButtonShop the Stencil:
Ready to start crafting? Get your Mushroom Stencil today and bring a touch of nature into your home decor.
Related Posts:
About A Makers' Studio:
At A Makers' Studio, we believe in the power of creativity to transform lives. Our kits and products are designed to inspire and empower you to create beautiful, functional art. Whether you're a seasoned crafter or just starting, we provide the tools and guidance to help you make something wonderful.

Craft Luxurious Candles from Home
DIY Candle Workshop: Crafting Your Own Luxury Candles at Home
Introduction
Creating your own luxury candles at home is a rewarding and enjoyable craft that can enhance your living space with beautiful fragrances and personalized touches. In this guide, we will walk you through the process of making homemade candles using the A Makers' Studio Homemade Candle Kit. This kit provides all the necessary materials and instructions, making it easy for beginners to get started. Whether you want to make candles for yourself or as gifts, this step-by-step guide will help you create stunning and fragrant candles.
Materials Needed
- A Makers' Studio Homemade Candle Kit
- Double boiler or microwave
- Measuring cup
- Spoon
- Hairdryer (optional for finishing touches)
Step-by-Step Candle Making Process
1. Prepare Your Workspace
Set up a clean and organized workspace. Ensure you have all the materials from the kit within reach. If using a double boiler, fill the bottom pot with water and bring it to a boil.
2. Melt the Wax
Place the soy wax pellets in the top pot of the double boiler or in a microwave-safe container. If using a microwave, heat the wax in intervals, stirring between each until fully melted.
3. Add Essential Oils
Once the wax is melted, add your choice of essential oils. The kit includes lavender, grapefruit, vanilla, lemon, and jasmine. For a 6 to 8 oz candle, add approximately 14 drops of essential oil. Adjust the amount to your preference for fragrance strength.
4. Prepare the Containers
Place the wicks in the center of the glass containers. The kit includes both wooden and soy wicks. Use the provided clips to secure the wicks in place.
5. Add Color (Optional)
If you wish to color your candles, add the wax pigment chips to the melted wax and stir until fully dissolved.
6. Pour the Wax
Carefully pour the melted wax into the prepared containers. Leave some space at the top if you plan to add decorative elements. Allow the wax to cool slightly before moving on to the next step.
7. Add Decorations
Use the silicone molds included in the kit to create decorative shapes, such as succulents, from the remaining wax. Pour the wax into the molds and let it set. You can speed up the process by placing the molds in the freezer. Once set, gently press the decorative shapes onto the top of the candles.
8. Finishing Touches
If needed, use a hairdryer to slightly melt the top layer of the candle and ensure the decorations adhere properly. Trim the wicks to about 1/4 inch above the wax surface.
Tips and Tricks
- Fragrance Blends: Experiment with different combinations of essential oils to create your own signature scents.
- Decorative Elements: Add dried flowers, herbs, or other natural materials to the wax for a personalized touch.
- Storage: Store your candles in a cool, dry place to maintain their quality and fragrance.
Benefits of A Makers' Studio Homemade Candle Kit
The A Makers' Studio Homemade Candle Kit provides all the essential materials and easy-to-follow instructions to create high-quality, natural candles at home. The kit includes organic soy wax, premium essential oils, and beautiful containers, ensuring you can craft luxury candles that are both beautiful and safe for your home.
Why Choose This Kit?
- Convenience: All materials are included, eliminating the need to purchase items separately.
- Quality: The kit uses natural and organic ingredients, ensuring a healthier home environment.
- Customization: With a variety of essential oils and decorative options, you can create candles that match your personal style.
- Value: The kit is a cost-effective way to enjoy luxury candles, with enough materials to make multiple candles.
Conclusion
We hope this guide has inspired you to try making your own luxury candles at home. The A Makers' Studio Homemade Candle Kit makes it easy and enjoyable to create beautiful, fragrant candles that you can be proud of. Whether you're looking for a new hobby, a unique gift idea, or a way to enhance your home, this kit is the perfect solution. Happy crafting!
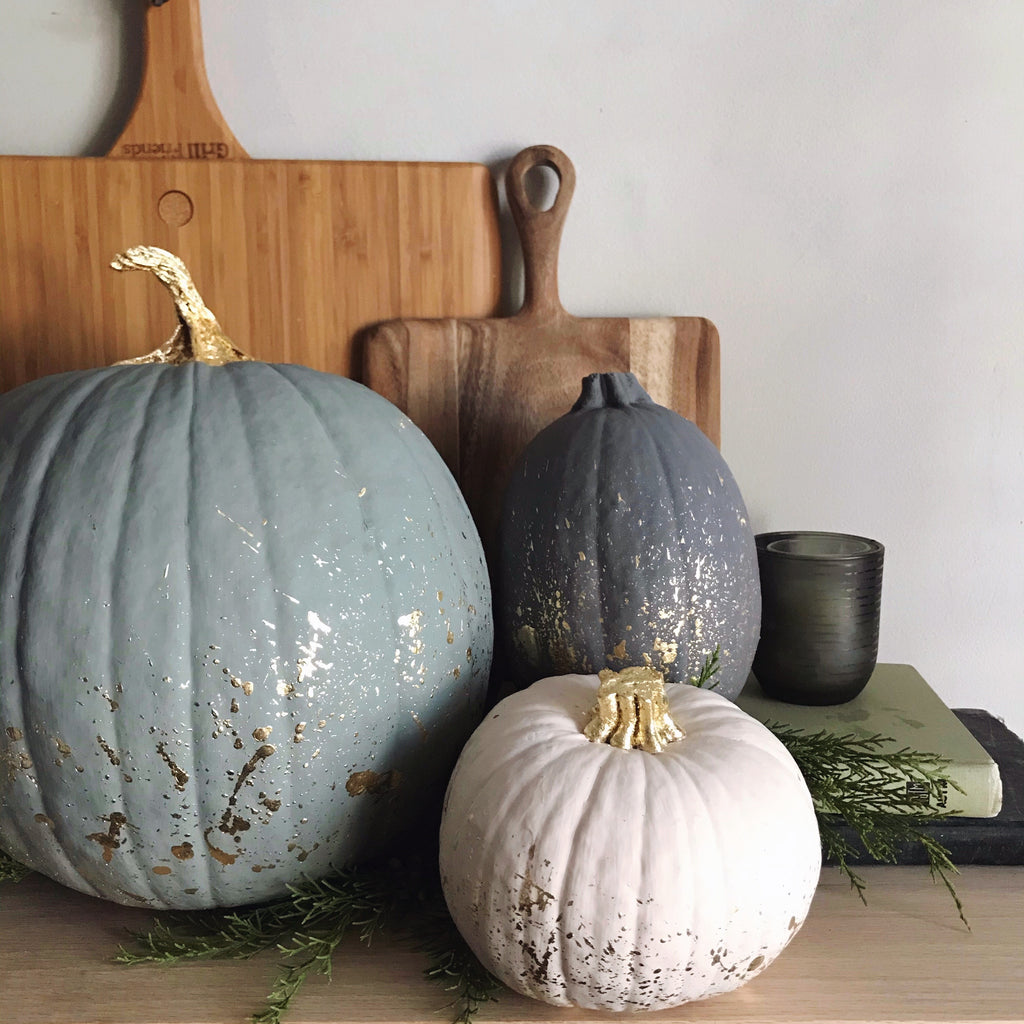
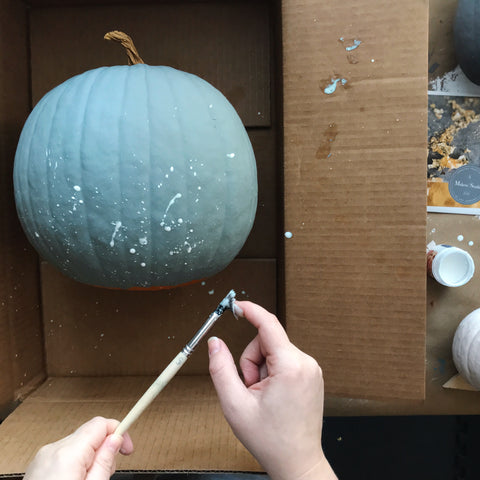
DIY Gilded Splatter Pumpkins
Follow the steps below to create these chic, gilded pumpkins! These will look gorgeous in your home or on your front porch.
Supplies needed:
- A Good Man is Hard to Find - One Step Paint Sample
- Vintage Affliction - One Step Paint Sample
- Bauhaus Buff - One Step Paint Sample
- Sponge Paint Brush
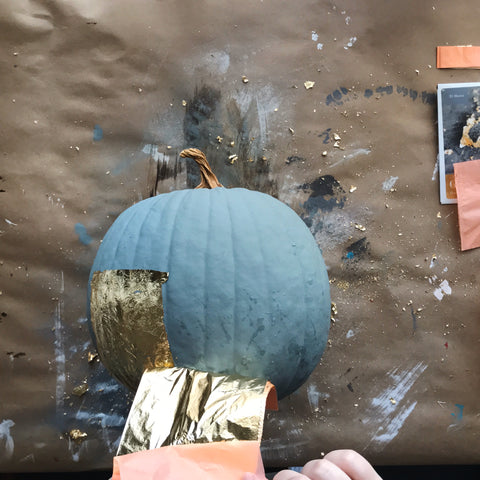
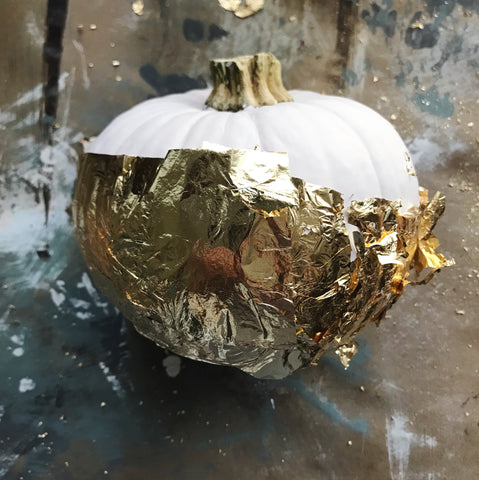
- Gilding Size
- Gold Leaf
- Artist Brush
- Chip Brush
Additional supplies needed:
- Pumpkins
- Cardboard box
Instructions


DIY Chalkboard Art
- Wooden Frame - 18x18
- Fresh Fruit Mesh Stencil
- Alphabet N-Z Mesh Stencil - or your choice of alphabet stencil
- One Step Pain Sample - Black
- ChalkArt - Hey Good Lookin'
- ChalkArt - Together Forever
- ChalkArt - Love Bug
- ChalkArt - I Reckon
- ChalkArt - Yes Ma'am
- ChalkArt - You Are My Sunshine
- ChalkArt - Orange You Cute
- ChalkArt - All Y'all
- 2.5 Chip Brush
- ChalkArt Spreader or Squeegee
*The ChalkArt colors listed are what we specifically used, but you may use as many or as little colors or variations as you'd like!
- Scissors


The great thing about ChalkArt is that you can change out the designs. Just take a damp paper towel or wash cloth and rub the ChalkArt off the surface to prep for a brand new design!


DIY Mushroom Patterned Pillow
- Piece of cardboard or paper plate


Repeat the process of step 2 until the entire pillow case is covered. Be aware to match up the edges of each new stencil placement so the pattern is continuous. Allow the paint to fully dry, then heat set with a warm iron (250 degrees) rubbing continuously for 3-5 minutes (use a piece of fabric or parchment paper to protect your design).


Oyster Shell Resin Art
Our blog unveils the creative process behind this unique art piece – from the careful selection of genuine oyster shells to the intricate resin pouring technique that captures the essence of the ocean's iridescent depths. Learn how resin can add depth and dimension, creating a lifelike representation of the oyster's inner shimmer.
- Oysters
- Water
- Small container
- Popsicle sticks


What is Resin Art | Beginner’s Guide to Getting Started
What is Resin Art? A Beginner’s Guide to Getting Started
Curious about resin art? Discover what resin art is, what it's made of, and how to get started with this comprehensive beginner's guide. Explore various types of resin art projects and learn the step-by-step process to bring your first masterpiece to life!
If you've ever come across mesmerizing glossy paintings, stunning jewelry pieces, or unique household accessories with a glass-like finish, chances are you've encountered resin art. But what exactly is resin art? In this beginner's guide, we will explore the world of resin art, including what it is, what it's made of, its uses in art, and how you can dive into this captivating art form. Get ready to unlock your creativity and embark on an exciting journey with resin art!
What is Resin Art?
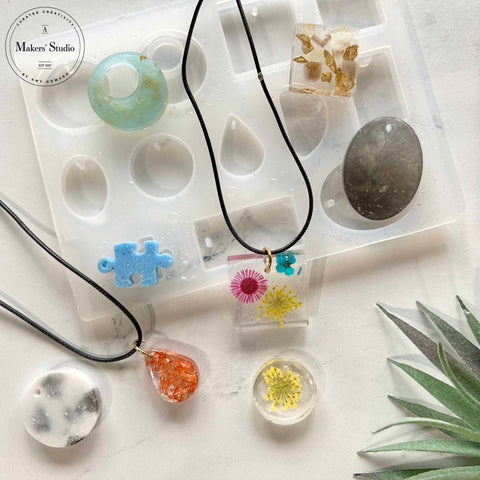
Resin art involves using a two-part epoxy resin, typically consisting of a resin and a hardener, to create unique pieces of art. When these components are mixed together, a chemical reaction occurs, resulting in a liquid mixture that can be poured, manipulated, and molded. As the resin cures, it transforms into a durable, glass-like finish that enhances the colors and textures of the artwork, creating a stunning visual effect.

Photo: Square Mold with black and white Alcohol Ink
What is Resin Art Made Of?
Resin art is made of a two-part epoxy resin. The resin is a thick, viscous liquid, while the hardener is a catalyst that triggers the curing process. These two components must be mixed in the correct ratio, usually specified by the manufacturer, to ensure a proper chemical reaction and a successful outcome. Additionally, pigments, dyes, or additives can be added to the resin mixture to create desired colors, effects, or textures in the artwork.
What is Resin Used for in Art?
Resin has a wide range of applications in the art world due to its versatility and transformative properties. To begin your resin art journey, simply mix A Resin with B Hardener in a 1:1 ratio, ensuring precise measurements. You'll have a working time of 20 minutes once mixed, with a gel time of 30 minutes. After application, allow the surface to dry for 6-9 hours. For crafting purposes, the through dry time is approximately 10-14 hours. For optimal results, apply a thin layer of the resin mixture as the first stage, allowing it to set up. Then, apply the second layer, creating a thickness of around 1/8 inches once dry. Depending on your project, 1 to 3 flood coats may be required.

Types of Resin Art Projects You Can Try First
Our Acrylic Glacier Resin is a game-changer in the world of resin art. It boasts a range of remarkable features, including being non-priming, odorless, and non-yellowing. The result? A crystal-clear coating with a glass-like quality that is hard and durable. To ensure your creations withstand the test of time, we have included a special UV protectant that prevents cracking, chalking, and yellowing.
Resin art offers a diverse range of creative opportunities. Here are some popular projects to get you inspired!
Resin Paintings:
Explore the world of abstract and contemporary art by pouring and manipulating resin on canvas or wood panels. Alcohol Inks and Mica Powders are the perfect tools to use with this technique.

Photo: Alcohol Ink with Alphabet A-M Mesh Stencil
Resin Jewelry:
Craft unique and stunning accessories by using our collection of resin jewelry molds and earring molds. The amazing thing is that jewelry made with resin is extremely lightweight and comfortable!

Photo: Gem Earrings Mold with Alcohol Inks
Resin-Coated Furniture & Household Accessories:
Transform ordinary furniture and household items by coating them with resin for a glossy, luxurious finish. Our resin coaster molds are perfect for creating functional and stylish coasters.

Photo: Tray Mold with Gold Leaf and dried fruit
Resin Flower Art:
Preserve the beauty of dried flowers by embedding them in resin, creating captivating floral displays. Our resin molds for dried flowers provide the perfect canvas for your botanical creations.

Photo: Bookmark Mold with Dried Flowers
Getting Started With Resin Art: Step-By-Step Guide to Bringing Your First Project to Life:
Now, let's dive into the process of creating your first resin art project. Although these steps can be tailored to A Makers' Studio molds, they serve as a general starting point for beginners:
- Gather Essential Tools and Supplies: including resin molds and molding tools. Shop all A Makers' Studio molds and accessories here!
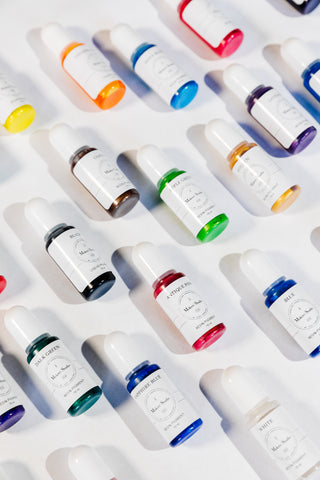
- Come Up With Your Vision: Visualize your desired outcome and plan the design and colors you wish to incorporate. You could use Alcohol Inks or Pigments to add a splash of color, or Gilding for sparkle.
- Choose Your Workspace: Select a well-ventilated area with a level surface to ensure a successful resin art experience.
- Prepare Your Resin Mixture: Follow the instructions for mixing your A Resin and B Hardener in a precise 1:1 ratio. Be sure to stir them together well to ensure a well incorporated mixture.
- Add Colors and Pigments: Enhance your resin art with pigments, dyes, or alcohol inks to create captivating effects. Here are some great ideas for giving your resin project another layer of dimension:
- Alcohol Inks, Pigments, Mica Powders - Shop Here
- Dried Flowers - Shop Here
- Gilding with gold, silver, or copper leaf - Shop Here
- Pouring and Manipulating Resin: Pour the resin mixture onto your chosen surface or mold, allowing your creativity to guide the process.
- Embedding Objects and Materials: Add depth and dimension to your artwork by embedding objects, such as shells, beads, or glitter, into the resin.
- Curing and Finishing Your Resin Art Project: Allow your piece to cure according to the recommended drying time, ensuring a durable and long-lasting finish.
With our Acrylic Glacier Resin and collection of molds, the world of resin art is yours to explore. Whether you're drawn to creating captivating paintings, unique jewelry, or stunning resin-coated furniture, the possibilities are endless. Embrace your creativity, follow our step-by-step guide, and let your imagination soar. Unleash the magic of resin art and experience the joy of bringing your visions to life.
Ready to embark on your resin art journey? Visit A Maker's Studio today and discover the transformative power of our Acrylic Glacier Resin and versatile molds. Begin creating beautiful, one-of-a-kind pieces that will leave you and others in awe. Unleash your artistic potential and start your resin art adventure now!
Related articles:
- Unique Resin Art Ideas for Beginners
- The Best Resin Molds for DIY Art Projects
- Floral Gilded Mirror
- Faux Tortoise Earrings with Resin


The Best Resin Molds for DIY Art Projects | A Makers' Studio
Introducing the Best Resin Molds for DIY Art Projects At Home
Discover the top resin molds for your DIY art projects at home. From silicone molds for resin coasters to molds for jewelry and more, find the perfect molds to elevate your creativity.
When it comes to creating stunning works of art with resin, having the best resin molds is essential. These molds play a crucial role in shaping your artistic vision and ensuring the success of your projects. At A Makers' Studio, we offer a wide range of high-quality resin molds that will take your DIY art projects to the next level. In this article, we will explore why you need the best resin molds, what sets the best brands apart, and reveal the top molds available in 2023.

Why You Need the Best Resin Molds:
1. Create Stunning Works of Art Effortlessly:
The best resin molds provide intricate and detailed designs that effortlessly enhance the beauty of your resin art. They enable you to create professional-looking pieces with ease, even if you're a beginner.
2. Increase the Durability of Your Art Projects:
High-quality resin molds ensure that your finished art pieces are durable and long-lasting. The molds' material and construction contribute to the strength and stability of the final product, making it suitable for various applications.
3. Reduce the Chances of Project Failure:
Using reliable resin molds minimizes the risk of project failures such as incomplete or distorted shapes. The precision and reliability of these molds allow you to confidently bring your artistic visions to life.
4. A More Enjoyable Art-Making Process Awaits You:
The best resin molds are designed to make your art-making process enjoyable and stress-free. With their ease of use and impressive results, these molds add an element of excitement and satisfaction to your creative journey.

What Separates the Best Brands of Molds for Jewelry Resin, Flowers, and More From the Rest?
1. Material Quality and Composition:
Top brands prioritize using high-quality materials, such as food-grade silicone, to ensure safety and optimal performance. These molds are non-toxic, heat-resistant, and produce excellent results.
2. Design Diversity and Uniqueness:
The best brands offer a wide range of designs and shapes to cater to various artistic preferences. From intricate jewelry molds to elegant flower molds, you can find molds that suit your specific project needs.
3. Mold Durability and Reusability:
The best resin molds are durable, allowing for multiple uses without compromising the quality of the castings. They are designed to withstand repeated use and maintain their shape over time.
4. Resistance to Deformation and Tearing:
Superior molds are resistant to deformation, tearing, or warping, ensuring consistent and accurate results. This feature is especially important for achieving intricate details and smooth finishes in your resin art.
5. Flexibility and Non-stick Properties:
The flexibility of high-quality molds makes it easy to remove the cured resin without damaging the mold or the finished piece. Non-stick properties ensure clean and effortless demolding.
6. Positive Customer Reviews and Testimonials:
The best brands receive positive feedback from satisfied customers who have experienced excellent results with their molds. Look for reviews and testimonials to gain insights into the reputation and reliability of a brand.
7. Responsiveness and Support from the Brand:
Choosing a brand that values customer satisfaction and provides excellent support can make your resin art journey more enjoyable. Look for brands that are responsive to inquiries and offer guidance or troubleshooting assistance.

So, What are the Best Resin Molds in 2023?
At A Makers' Studio, we take pride in offering a curated collection of the best resin molds for DIY art projects. Our molds are carefully selected to meet the highest standards of quality and design. Here are some of our top recommendations:
How Our Silicone Molds for Resin Art Can Transform Your Process:
1. Best Silicone Molds for Resin Coasters & Other Decor:
Resin Coaster Molds: Create stunning and functional coasters with unique designs. Shop Coaster Molds.
Décor Molds: Elevate your home décor with beautifully detailed molds for wall art, decorative accents, and more. Shop Décor Molds.
Decorative Silicone Molds: Explore a variety of shapes and patterns to add an artistic touch to your resin creations. Shop Decorative Molds.


2. Best Silicone Molds for Jewelry:
Resin Earring Molds: Craft beautiful earrings with intricate designs and stunning details. Shop Earring Molds.
Resin Jewelry Molds: Design unique pendants, bracelets, and other jewelry pieces with ease. Shop Jewelry Molds.
3. Best Silicone Molds for Dried Flowers:
Resin Molds for Dried Flowers: Preserve the natural beauty of dried flowers in your resin art with these specialized molds. Shop Dried Flowers.
4. Best Silicone Molds for Letter Art:
Silicone Letter Molds: Personalize your resin art with custom messages, names, or monograms using these letter molds. Shop Letter and Word Molds.
5. Don't Forget Your Molding Tools!
To complement your resin molds, it's important to have the right molding tools. These tools assist in the resin pouring and demolding process, ensuring smooth and precise results. Explore our collection of molding tools to enhance your resin art experience. Shop Tools and Accessories.

Bringing Our Conversation on the Best Resin Molds to a Close:
Investing in the best resin molds is a game-changer for your DIY art projects. By choosing molds from reputable brands, you gain access to exceptional quality, unique designs, and reliable performance. At A Makers' Studio, we understand the importance of superior molds in elevating your creativity and achieving outstanding results. Explore our collection of the best resin molds and embark on a resin art journey that exceeds your expectations.
In summary, the best resin molds are essential for creating stunning works of art effortlessly, increasing the durability of your projects, reducing the chances of failure, and enjoying a more fulfilling art-making process. The best brands of molds for jewelry resin, flowers, and more stand out through their material quality, design diversity, mold durability, non-stick properties, and positive customer reviews. At A Makers' Studio, we offer an outstanding selection of silicone molds for resin coasters, jewelry, dried flowers, and letter art. Don't forget to complement your molds with the right molding tools for a seamless resin art experience.
Discover the best resin molds for your DIY art projects at A Makers' Studio. Visit our website to explore our collection and start creating your masterpiece today.
Related articles:

Unique Resin Art Ideas for Beginners | A Makers’ Studio
Not sure where to start your next project? Our unique epoxy resin art ideas for beginners will offer inspiration as you bring your next work of art to life!
Unique Resin Art Ideas for Beginners: Inspiration For Your Next Project!
Resin art has gained immense popularity in the world of crafting and DIY projects. The mesmerizing patterns, vibrant colors, and glossy finishes created with epoxy resin make it a versatile medium for artistic expression. If you're a beginner looking for unique resin art ideas to dive into this captivating art form, you've come to the right place. In this article, we'll provide you with inspiration and ideas to get started on a beautiful resin art project!
Unique Epoxy Resin Art Ideas for Beginners:
1. Personalized Coasters: Create custom coasters by pouring resin into coaster molds. Add dried flowers, glitter, or even small trinkets to make each coaster unique. Shop coaster molds!

2. Decorative Wall Hangings: Use decorative silicone molds to create intricate resin shapes and arrange them on a wooden panel for a stunning wall art piece. Shop our Decorative Molds!
3. Custom Trinket Trays: Design and craft your own trinket trays using resin. Choose different shapes and sizes of molds to create personalized organizers for your jewelry and small accessories.
4. Statement Earrings: Experiment with resin earring molds to make eye-catching and unique earrings. Incorporate colors, glitter, or metallic flakes to add flair to your accessories. Shop Earring Molds!

5. Unique Pendant Necklaces: Create beautiful pendant necklaces by pouring resin into jewelry molds. Embed small objects like dried flowers, beads, or even tiny charms to make each pendant one-of-a-kind. Shop Jewelry Molds!
6. Alphabet Magnets: Make personalized alphabet magnets for your fridge or magnetic board using silicone letter molds and resin. Choose your favorite colors and create a set of custom magnets. Shop our Alphabet Mold!

7. Handmade Bracelets: Use resin to make stunning bracelets by pouring it into bracelet molds. Incorporate pigments, mica powders, or alcohol inks to achieve captivating designs. Shop Jewelry Molds!

8. Floral Paperweights: Preserve the beauty of dried flowers by embedding them in resin molds to create exquisite paperweights. Arrange the flowers in captivating patterns for a touch of nature on your desk.
9. Custom Keychains: Pour resin into keychain molds and add decorative elements like glitter, small trinkets, or personalized messages. These custom keychains make thoughtful gifts or unique accessories. Shop our Alphabet Mold!

10. Marbled Ring Dishes: Create marbled patterns on resin ring dishes by mixing different colors and swirling them together. These elegant and functional dishes are perfect for storing your rings or small jewelry items.
11. Personalized Name Plaques: Craft personalized name plaques by pouring resin into letter molds and arranging them to spell out names or meaningful words. Add pigments or metallic powders for a striking effect.
12. DIY Phone Grips: Create custom phone grips by molding resin into unique shapes and attaching them to a phone grip base. Customize the colors and patterns to match your style. Shop our Pop Out Project!
13. Resin Bookmarks: Make beautiful bookmarks by pouring resin into bookmark-shaped molds. Add dried flowers, small charms, or colored pigments to create stunning designs. Shop our Bookmark Mold!

14. Wine Glass Charms: Create wine glass charms by molding resin into small shapes and attaching them to wine glass rings. These charming accessories will help your guests identify their glasses.
15. Layered Resin Art: Experiment with layering different colors of resin to create captivating abstract art pieces. Pour layers of resin in various shades and swirl them together for a stunning visual effect.
16. Resin Buttons: Make your own unique buttons by pouring resin into button-shaped molds. Customize them with pigments or embed small objects for added interest.
17. Fridge Magnet Photo Frames: Craft mini photo frames using resin and attach magnets to the back. Display your favorite memories on your refrigerator in a creative and personalized way.
18. Resin Floral Notebook: Let your creativity bloom as you design your own floral patterns and create a one-of-a-kind notebook that will inspire and delight every time you open it. Perfect for journaling, sketching, or gifting to someone special, this resin floral notebook project is a wonderful way to combine artistry and functionality. Shop our Notebook Mold!

Now, Bring These Epoxy Resin Art Ideas to Life With the Help of A Maker’s Studio!
To bring these resin art ideas to life, you'll need the right supplies. A Makers’ Studio offers a wide range of high-quality resin molds, molding tools, and decorative molds to support your artistic endeavors. Visit our website to explore our collection and find the perfect supplies for your resin art projects.
Get Your Supplies
Visit A Makers’ Studio to browse our selection of resin molds, molding tools, and decorative molds to bring your resin art ideas to life. We have so many accessories that will add depth and customization to all your resin projects. Check them out below!
Tips for Getting Started:
- Follow safety precautions when working with resin, such as wearing gloves and working in a well-ventilated area.
- Read and follow the manufacturer's instructions for your specific resin product.
- Experiment with different color combinations, pigments, and additives to achieve unique effects.
- Take your time and be patient. Allow each layer of resin to cure fully before adding another layer or unmolding your creations.
Parting Thoughts on Ideas for Resin Art You Can Try Yourself:
Resin art offers endless possibilities for creativity and self-expression. Whether you're a beginner or experienced artist, these unique resin art ideas provide a starting point for your artistic journey. Explore different techniques, experiment with colors and materials, and let your imagination run wild. With resin, you can create stunning works of art that reflect your personal style and captivate the eye.
Gather your supplies, unleash your creativity, and embark on an exciting resin art adventure today!


How to Apply Gel Stain
How to Apply Gel Stain to Wood Evenly (Finished or Unfinished)
Are you looking to revitalize your wooden furniture or décor? Gel Stain can be a game-changer. It's a versatile and easy-to-use product that allows you to achieve stunning results, whether you're working with finished or unfinished wood. In this comprehensive guide, we'll show you how to apply Gel Stain to wood evenly, unlocking a world of possibilities for enhancing the beauty of your wooden surfaces.

Why Learn How to Apply Gel Wood Stain?
Gel Stain is a popular choice among DIY enthusiasts and professionals alike. It offers several advantages over traditional wood stains, making it worth your time to learn how to apply it effectively. Gel Stain is thicker and more forgiving than liquid stains, making it easier to control and reducing the chances of streaks and blotches. It also provides better coverage and allows for more color control, giving you greater flexibility in achieving the desired look for your project.Benefits of Using Gel Stain to Breathe Fresh Life into Wooden Surfaces:
Using gel stain can breathe new life into tired wooden surfaces. Here are some of the key benefits:
1. Enhanced Color: Gel Stain provides rich and vibrant color that enhances the natural beauty of the wood grain.
2. Easy Application: Its thick consistency makes it easy to apply, even for beginners.
3. Reduced Prep Time: Unlike traditional stains, gel stain often requires minimal sanding or stripping, saving you time and effort.
4. Versatility: Gel Stain can be used on a variety of wood surfaces, including furniture, cabinets, doors, and trim.
5. Long-lasting Finish: Gel Stain offers excellent durability and protection, ensuring your wood surfaces stay beautiful for years to come.
The Versatility of Gel Stain Applications:
Gel stain can be used to achieve a variety of finishes and effects. From traditional wood tones to bold and contemporary colors, Gel Stain can help you achieve the look you desire. It can mimic the appearance of different wood species, allowing you to transform inexpensive wood into a high-end look. You can also use Gel Stain to create unique effects such as distressed or antique finishes, giving your projects a one-of-a-kind appeal.
Take a look at the A Makers' Studio collection of Gel Stains here, choose your color, and start Crafting Your Beautiful Life!


How to Apply Gel Stain to Wood:
Now that you understand the benefits and versatility of Gel Stain, let's dive into the step-by-step process of applying it to wood surfaces.
1. Preparation: Start by ensuring your wood surface is clean, dry, and free from any existing finish or debris. If needed, sand the surface lightly to promote better adhesion.
2. Stir and Test: Thoroughly stir the Gel Stain to ensure an even color consistency. Before applying it to your project, test the stain on a small, inconspicuous area to ensure it achieves the desired color.
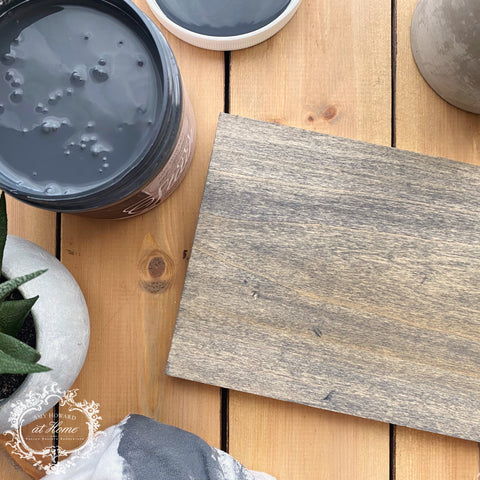
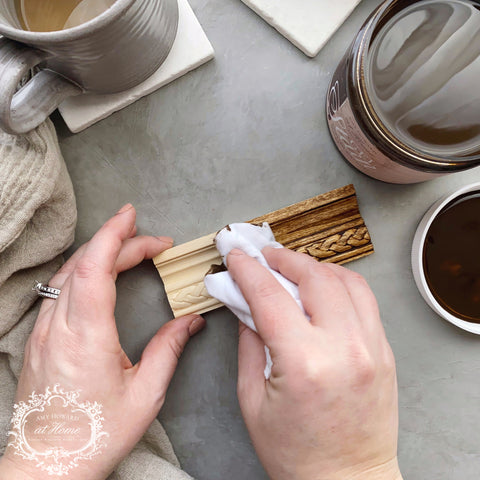
3. Application: Using a brush, cloth, or sponge applicator, apply a thin and even layer of Gel Stain in the direction of the wood grain. Work in small sections to prevent the stain from drying before you can blend it. Allow the stain to penetrate the wood and sit for a longer amount of time if you'd like the stain to present a darker color. Wipe the stain shortly after application if you'd like the stain to present a slightly lighter color.
4. Blending and Wiping: After the recommended penetration time, use a clean cloth or rag (we recommend using lint free rags like t-shirt material) to wipe away any excess stain, blending the color evenly. Be sure to follow the instructions provided on the container for the best results.
5. Drying and Curing: Allow the Gel Stain to dry completely according to the instructions. It's essential to provide ample drying time to ensure a durable finish. Once dry, the stain will need time to cure fully, so avoid placing objects on the stained surface for a few days.

General Tips for Applying Gel Stain to Wood:
Here are some additional tips to help you achieve the best results when working with Gel Stain:
1. Work in a well-ventilated area to ensure proper air circulation and avoid inhaling fumes.
2. Protect your work area with drop cloths or newspapers to prevent staining or damage to surrounding surfaces.
3. Use gloves to protect your hands and consider wearing a mask for added protection.
4. Always follow the instructions and recommendations for the specific Gel Stain product you are using.
How to Apply Gel Stain to Unfinished Wood Specifically:
Unfinished wood surfaces provide an excellent canvas for Gel Stain. The process is similar to the general application steps mentioned earlier. However, since unfinished wood tends to absorb more stain, you may need to apply multiple coats to achieve the desired depth of color. Allow each coat to dry completely before applying the next one.
How to Apply Gel Stain to Finished Wood Specifically:
Applying Gel Stain to finished wood requires some additional preparation. Start by cleaning the surface to remove any dirt, wax, or oils. Lightly sand the finish to create a better bond for the Gel Stain. Follow the general application steps, ensuring even coverage. If desired, you can also use a bonding agent specifically designed for Gel Stain and finished surfaces to promote better adhesion.
Putting the Finishing Touches on Your Project:
Once the Gel Stain is dry and cured, you may consider adding additional decorative accents to elevate your project further. Stencils and paint can be excellent tools for creating unique designs on your stained wood surface. Consider using Mesh Stencils to add patterns, quotes, or even Bible verses to create a personalized touch. You can find a wide variety of Mesh Stencils suitable for different themes, holidays, and styles here at A Makers' Studio.
- Bible Verse Stencils
- Quote Stencils
- Holiday Stencils
- Pattern Stencils
- Animal Stencils
- Letter Stencils

Restoring Hardware and Other Accents for a Complete Makeover:
To complete your Gel Stain project, don't forget to restore any hardware or accents. Remove and clean existing hardware, such as knobs or hinges, and consider giving them a fresh coat of paint or finish to match your newly stained wood. Additionally, explore other accents like Decorative Silicone Molds, Chalk Paste, or Gel Art Ink that can add texture and interest to your project.
Closing Thoughts on How to Apply Gel Stain to Wood:
Learning how to apply gel stain opens up a world of possibilities for transforming your wooden furniture or décor. Whether you're working with finished or unfinished wood, the application process is straightforward and can yield remarkable results. Gel Stain provides durability, vibrant color, and versatility, allowing you to express your creativity and enhance the natural beauty of wood. So why wait? Start your Gel Stain journey today and unlock the potential of your wooden surfaces!
Explore our collection of reusable Mesh Stencils, Decorative Silicone Molds, Chalk Paste, and Gel Art Ink to take your Gel Stain projects to the next level.
Related articles:

Where to Buy Chalk Paste
Wondering where to buy chalk paste? Whether you need paint for a one-time project or you want to buy wholesale art chalk in bulk for your retail business, A Makers’ Studio has you covered.
Where to Buy Chalk Paste for the Versatile, High-Quality Paint You Deserve
When it comes to finding the perfect chalk paste for your creative projects, look no further than A Makers' Studio. Our selection of ChalkArt paste is unparalleled, offering the versatility and high-quality paint you deserve. A Makers' Studio ChalkArt is a water-based chalk paste that allows you to effortlessly customize a wide range of surfaces, including furniture, tabletop décor, glass, and more. One of the standout features of this chalk paste is its quick drying time, taking just 15 minutes to transform your piece into a beautiful work of lettering or artwork. The best part? You can easily change up your design later by cleaning the piece with a wet rag, allowing you to create something entirely new. To take your creations to the next level, we also offers uniquely detailed and patented mesh decorative stencils, enabling you to achieve professional designs repeatedly on almost any surface. Whether you're customizing décor for weddings and events, hosting like a pro with beautifully designed placemats, or giving your furniture a magazine-worthy update, ChalkArt from A Makers' Studio is your go-to solution for unleashing your creativity and bringing your vision to life.

Why Where You Buy Chalk Paste is More Important Than You May Realize
When it comes to creating stunning chalk art, the quality of your chalk paste can make all the difference. It's not just about the design and technique; where you buy your chalk paste plays a crucial role in the final outcome. That's where A Makers' Studio comes in. Our ChalkArt is a game-changer when it comes to versatility and high-quality results. This water-based chalk paste allows you to effortlessly customize a wide range of non-porous surfaces, including furniture, tabletop décor, and glass. The beauty of ChalkArt lies in its quick drying time, with just 15 minutes needed to transform your creation into a gorgeous piece of lettering or artwork. But what sets A Makers' Studio apart is the ability to easily change up your design. By simply cleaning the piece with a wet rag, you can wipe away your previous creation and start anew. And if you're looking to take your designs to the next level, A Makers' Studio offers uniquely detailed and patented decorative Mesh Stencils that allow you to create truly professional designs on almost any surface, time and time again. No matter what kind of project or craft you're working on, the quality of your chalk paste from A Makers' Studio will ensure your artistic vision becomes a reality. Don't settle for anything less than the best when it comes to your chalk art—choose A Makers' Studio and experience the difference for yourself.
What to Consider Along Your Search for Where to Buy Chalk Paint Paste
When embarking on your search for where to buy chalk paint paste, there are several factors to consider that can make a significant difference in your overall experience and results. One crucial aspect is the color selection offered by the supplier. The best providers will offer a wide range of vibrant and diverse colors, allowing you to unleash your creativity and find the perfect shades to bring your vision to life. Another important consideration is the ease of use of the chalk paste. Look for a supplier that offers a product with a smooth and creamy consistency, making it effortless to apply and create precise designs. Additionally, versatility is key. Seek out a chalk paste that can be used on various surfaces, such as furniture, glass, and non-porous materials, expanding the possibilities for your projects. A truly exceptional supplier will offer a water-based chalk paste that is not only easy to work with but also allows for easy clean-up and the ability to modify your designs as desired. By carefully considering these factors—color selection, ease of use, and versatility—you can ensure that you make a well-informed decision and find a supplier that offers the best chalk paint paste for your artistic endeavors.


Where to Buy Chalk Paste That Checks All These Boxes and More: A Maker’s Studio
What Makes Our Chalk Paint Paste so Great?
When it comes to finding a supplier that checks all the boxes for high-quality chalk paste, look no further than A Makers' Studio. We go above and beyond to provide an exceptional product that will elevate your DIY art projects to new heights. What makes our chalk paint paste so great? Let's start with the fact that we offer an extensive color selection, ensuring that you have a wide range of vibrant options to choose from for your creative endeavors. Moreover, our chalk paste is designed with ease of use in mind. With its smooth and creamy consistency, it effortlessly glides onto surfaces, allowing you to create precise and stunning designs with ease. The versatility of our chalk paste is another standout feature. It can be applied to various surfaces, including furniture, glass, and non-porous materials, opening up a world of possibilities for your projects.
We Have All the Other DIY Art Project Supplies You Need to Create Something You’re Proud of
What sets A Makers' Studio apart is that we don't stop at chalk paste. We understand that DIY art projects often require additional supplies, and we have you covered. From stencils to brushes and everything in between, we offer a comprehensive range of art project supplies so we can be your one-stop-shop to help you bring your creative visions to life. With A Makers' Studio, you can confidently embark on your DIY art projects, knowing that you have a reliable and exceptional supplier by your side.
Check out our other amazing products and start Crafting Your Beautiful Life!


Buy in Bulk - Retailer Resources
At A Makers' Studio, we believe in making our chalk art paste accessible to retailers who share our passion for creativity and quality. We offer the opportunity for retailers to purchase our chalk art paste directly from us, ensuring they can provide their customers with a versatile and high-quality product. Additionally, we understand the importance of convenience and accessibility, which is why we have partnered with Faire. Through Faire, retailers can easily browse and order our chalk art paste, along with other DIY art project supplies, all in one convenient platform. Whether retailers choose to purchase directly from us or through Faire, we are committed to providing exceptional products and support to help them elevate their offerings and inspire their customers' creativity.
Sign up for Faire today and receive the following amazing benefits!
Now That You Know Where to Buy Chalk Paste, Bring Your Artistic Vision to Life!
Now that you know where to buy chalk paste that meets all your needs and exceeds your expectations, it's time to unleash your artistic vision and bring it to life. With the exceptional quality and versatility of chalk paste from A Makers' Studio, you have the tools to transform ordinary surfaces into extraordinary works of art. Whether you're looking to customize furniture, add a personal touch to tabletop décor, or create eye-catching designs on glass, A Makers' Studio has you covered. Our wide color selection, ease of use, and commitment to providing all the necessary DIY art project supplies ensure that you have everything you need to create something you're truly proud of. Don't wait any longer. Dive into your creative journey, armed with the knowledge of where to buy the best chalk paste, and watch as your artistic vision comes to life in vibrant colors and exquisite designs! The possibilities are endless, and we are here to support you every step of the way. Let your imagination run wild and let the artistry begin!

What Material Can I Use Chalk Paste On? | Best Surface for Chalk Paste
Can you use chalk paint on any surface? If not, what material can I use chalk paste on? Find answers in this discussion on the best surface for chalk paint!
What Material Can I Use Chalk Paste On? The Best Surface for Chalk Paste Explained
Whether you’re an event planner or you’re simply looking for a creative outlet, you’re going to love our products. It’s been said that an artist is only as good as their tools and supplies - and we couldn’t agree more. We believe an artist exists within each of us, but some people don’t feel confident or capable enough to set themselves free and unleash their artistic side. Well, no longer!
It’s time to see what’s possible with the help of our incredible chalk art paste. Explore the various colors here on this page - from simple shades to stunning colors you won’t find anywhere else. Or, keep reading to learn more about what separates our selection from the rest.

Can You Use Chalk Paste on Any Surface?
Chalk paste is incredibly versatile and can be used on various materials. It is primarily designed for non-porous surfaces such as glass, metal, and plastic. This means you can customize your furniture, tabletop décor, mirrors, windows, and more with ease. The smooth and creamy consistency of chalk paste allows for seamless application and adherence to these surfaces, resulting in a professional-looking finish.
What Material Can I Use Chalk Paste On?
Chalk paste is most commonly used on non-porous surfaces such as glass, metal, and plastic. This allows the Chalk paste to be removable so you can create design after design and change things up. This is the perfect paint and technique for a charcuterie board, chalk board, signs, or any other surface you want to be able to change. Chalk paste can also be used on porous surfaces such as paper, wood, plastic, and metal. If used on paper, or any other soft surface, the Chalk paste will be permanent and not be able to be removed as it would be with a hard non-porous surface.
What is the Best Surface for Chalk Paste?
The best surface for Chalk paint really depends on your project. If you want a design that can be removed and changed out, than glass, metal, plastic, or wood surface will be best so the ChalkArt may be removed with a damp rag. If you'd like your work to be permanent, then you should use ChalkArt on a porous surface such as paper.

Other Tips for Perfecting Your Project & Creating a Stunning Work of Art
To perfect your project and create stunning works of art, consider a few additional tips. Firstly, take advantage of the variety of colors our chalk paste offers. Whether you prefer simple shades or vibrant hues, our selection has something for everyone. Secondly, don't hesitate to explore our wide range of stencils. From animal stencils to Bible verse stencils, holiday designs, ABCs, and inspiring quotes, our collection has the perfect stencil to complement your chalk paste creations. Lastly, give your artwork sufficient drying time of approximately 15 minutes to ensure a durable and long-lasting finish. When you reveal your masterpiece to others, their expressions of awe and wonder will leave them guessing how you achieved such remarkable results. We're here to support your creative journey and provide recommendations if needed. Our passion lies in helping you create beautiful and unique pieces using our chalk paste. Experience the difference firsthand and unleash your inner artist!
Find All Your Supplies at A Makers' Studio to Set Yourself up for Success
Shop the supplies that can get you started Crafting Your Beautiful Life!
Bringing Our Conversation on the Best Surface for Chalk Paste to a Close
Chalk paste is a game-changer when it comes to customizing decorations for weddings or other events with a professional touch. It also offers a fantastic solution for breathing fresh life into old decor items. At A Maker's Studio, we take pride in offering the most versatile and high-quality chalk art online. Our water-based chalk paste is compatible with various finishes, including furniture, tabletop decor, glass, and almost any non-porous surface. The possibilities are limitless! What sets our chalk art paste apart is not only its compatibility but also its easy removal and refreshment. With a simple wipe of a wet rag, you can effortlessly wash off your design and create something new. This allows you to experiment and update your creations as your inspiration evolves. By pairing our chalk paste with our extensive selection of stencils, you can unlock a world of creativity and leave people amazed by your artistic prowess.