Inside A Makers' Studio
Inside A Makers' Studio

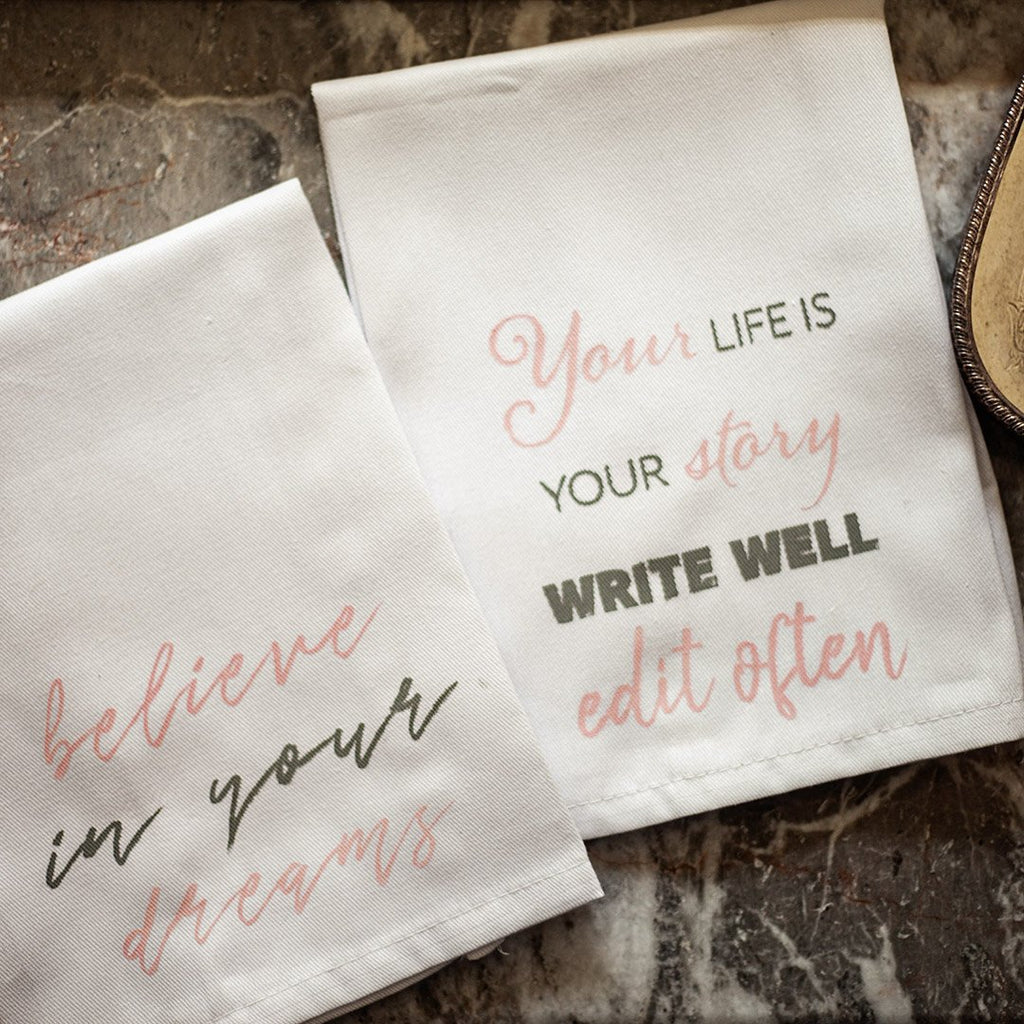
YOU ARE A MAKER
As a seasoned business owner, I have experienced just about every kind of victory, misstep, and hard-earned growth there could be on an entrepreneurial journey. These past years have been exactly what I dreamed they would be, and yet absolutely nothing like I expected all at the same time! I can’t help but look down the roads I’ve traveled and see very distinctive markers that have made all the difference in both my personal life and professional career.
The desire to share these golden truths with you is burning in my heart, in the hope that you, too, will experience the blossoming of your own dreams. Sometimes, all someone needs to start pursuing their dreams is someone to tell them that they can. And I’m here, as your guide and biggest cheerleader, to tell you that you can. You absolutely can.
After all, you are a maker.
ACKNOWLEDGE AND UNDERSTAND YOUR TALENTS

How do you begin to honestly assess and understand your talents? First, I suggest taking a free, short personality test called the DISC. As the DISC personality test instructions say, answer each statement honestly and spontaneously. Sometimes choosing the statements can be tough, but make the best decision you can. When you’re done, you’ll find your DISC type. This is not for my benefit, as I receive no compensation. It’s for you: this test will help you see your strengths and characteristics laid out before your eyes.
Whether you’re a blogger, local shop owner, or have just begun to test the idea of making a living doing what you love, the first thing you must do is acknowledge your talents, and then understand them. Your greatest chances of being a successful maker lie within your wealth of self-knowledge and quiet confidence.
TAP INTO THE MAKER MOVEMENT

In recent years, something quite phenomenal has taken place. It’s lovingly referred to by some as the “Maker Movement”: creative men and women are moving in studios and storefronts, armed with their craft and a laptop. And dovetailing this, our culture has warmed to the idea that owning a unique, high-quality item handmade with love is far more fulfilling than buying a cheap item made and shipped from who knows where (for a price we’d rather not know).
As a maker, remember that your passion worth sharing. And awaiting market is ready and eager to have you!
Every one of us is capable of “making” something, of course, but a true maker carries an unshakable conviction to share their creative notions and compositions with the world. For us makers, it is an honor to make something beautiful that both fills a personal creative need and serves a vital purpose in society. The first step in serving your purpose as a creative business owner is understanding oneself.
Dear maker, you are an entrepreneur. Your unique talents are waiting to be developed. So get out there, and get started!
XOXO, Amy Howard
YOUR DREAMS ARE A PART OF YOU — AND YOUR SUCCESS
As a full grown adult, nothing can feel quite as vulnerable as acknowledging your dreams. Nothing can fulfill you more, and, ironically, nothing can scare you more.
For most of us, our dreams have been tucked away for a very long time.
For some of us, we might even say our dreams are long-forgotten.
But just because something has been covered up doesn't mean it deserves to be hidden — we simply haven’t found a way to bring it to the light yet!
It’s a disheartening fact that 70% of Americans hate their jobs. That statistic shows what settling looks like. When you outgrow dreaming, you outgrow valuing that part of you that is invaluable: your individuality.
Anytime we suppress a part of ourselves, we become miserable.
What’s more, anytime you feel as though you have to hide a part of yourself from someone, you begin to lose trust in that person.
Dear Maker, one of the best pieces of advice I can give you on this journey is to trust yourself enough to acknowledge who you are as a creative individual, and don’t hide it.
HOW DOES YOUR DREAM FIT INTO YOUR LIFE NOW?
Dreaming as an adult means dreaming on a practical level, as much as it does on a visionary level. As children, our dreams consisted of big picture successes piggy-backed on the most prodigious adventures our mind could conjure. The sky was the limit, and the details of how to get there—pshhhhh! What details?!
As an adult, however, when you dream of your future, your plans automatically consist of the big questions:
“HOW WILL I EVER GET THERE?”
“HOW MUCH WILL IT COST?”
“WHAT IF I FAIL?”
Start-up expenses, budget planning, market share, continuing education, and training all have to be considered when you think about one day achieving your dream. But for now, you are still dreaming… and you allow the thoughts of how you’ll get there distract you from actually trying.
Acknowledging your dream is one thing, but valuing it so that you don’t find yourself burying it again is an entirely different level in your entrepreneurial growth.
Think of it this way: When you realize your dream is not only a part of who you are, but who you have always been, you’ll be convinced that this part of your individuality is not just inescapable, it’s more than likely one of the key factors that make you, YOU!
But how do you get there, and what do you need to work on so that you can commit to realizing that dream you’ve held inside?

HOW TO RECONNECT WITH YOUR DREAM (AND YOURSELF)
Close your eyes and ask yourself these questions:
1) What fulfilled you more than anything when you were a child?
2) What are your fondest, most fulfilled memories as an adolescent?
3) What are you doing when you are happiest as an adult?
4) What work has fulfilled you more than any other?
You see, dear Maker, you are still that same person. You have always held the same arena of passions and talents. Over the years, they have just grown up and taken on new forms as you’ve matured.
THIS STAGE OF YOUR JOURNEY IS ABOUT GOING BACK TO YOUR FIRST LOVE.
You were born with everything you need to be fulfilled as an adult because you were made to be the person you have always been. Nothing fulfills us like working in our passions: unhidden, uncompromised, and ever-evolving.

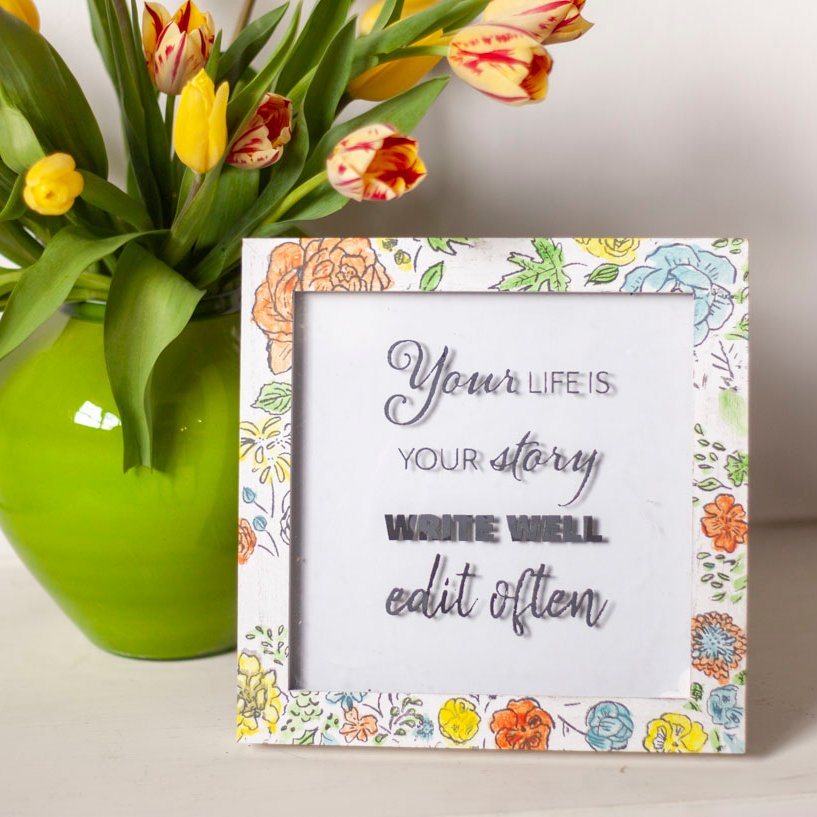
WATERCOLOR WASH PROJECT
Arguably the most frustrating thing about starting a craft project is trying to find all the right supplies you’ll need to complete it. That’s why we’ve put together Maker Monday bundles like this Watercolor Wash Bundle, which includes a stencil, Gel Art Ink samples, and other tools. With this kit, you’ll be able to create a gorgeous framed quote on a watercolor background. Your watercolor artwork can add a touch of color and inspiration to a spot in your home, or make a sweet gift for someone else.
But we don’t just give you the tools and tell you to figure it out! Amy Howard walks you through each bundle every week on Maker Monday, and this week is no different. So make sure to check out the bundle and follow along with Amy in this video so you can make some beautiful watercolor decor and gifts:
MATERIALS YOU’LL NEED

You’ll need the materials included in the Watercolor Wash Bundle, which includes:
- Believe In Your Dreams Stencil
- If the Creek Don't Rise Gel Art Ink Sample
- Hey Y'all Gel Art Ink Sample
- Bless His Heart Gel Art Ink Sample
- Metallic Gold ChalkArt Sample
- Spreader
- Artist’s Brush
You’ll also need sheets of watercolor paper and new or rescued frames for this project, along with a dish or plate to hold your inks.
CREATING YOUR FRAMED WATERCOLOR ARTWORK
- First, add a few tablespoons of water to a dish or plate.
- Take your artist’s brush and dab a small amount of Bless His Heart Gel Art Ink into the water. Mix well. Use a ratio of 75% water and 25% ink to get the pretty pink watercolor wash you see in Amy’s video.
- Once you’ve mixed Bless His Heart with water, test out the watercolor wash on a scrap piece of paper to make sure you’re happy with the color.
- When you’re testing out the watercolor wash, you can also practice your brushstrokes. Hold the brush at an angle so the bristles are nearly horizontal. When you paint using angled, sweeping strokes, you’ll get that beautiful layered watercolor effect.
- Next, cut out the part of the stencil you’re going to use.
- Lay out the stencil on your sheet of watercolor paper (don’t remove the backing yet) to see how much of the sheet you’ll paint. The background should be a little bigger than the stencil, but leave enough room for a border.
- Set the stencil aside so you can begin painting your sheet with a watercolor wash. Remember to hold the brush horizontally and use long, continuous strokes.
- Spread the paint down the sheet with your brush to create a thin, layered look. It’s not going to look perfect, and that’s the effect you’re going for!
- Once your sheet is dry, remove the adhesive back to your stencil and apply it to the center of your sheet.
- Load up your spreader with a small amount of Metallic Gold ChalkArt.
- Apply it on top of your stencil. Use a little pressure to press the Metallic Gold through the stencil.
- Pull the stencil from your watercolor sheet and let it fully dry.
- Finally, you can place your watercolor sheet inside a new or rescued frame. It’s now ready to hang in your home or be gifted to someone else!
WATERCOLOR WONDERS

Whether you want to create a beautiful frame, decorate a tea towel, or even stationery, Amy shares a handful of great ways to use these Gel Art Ink samples. Be sure to check out this week’s Maker Monday video — and don’t forget the Watercolor Wash Kit. It has everything you need to get that beautiful watercolor wash… permanently!
For more tips on using your Maker Monday kits, Like and Follow A Makers’ Studio on Facebook. Tune in on Mondays at 10 am Central every week for great tutorials like these!
HOW A LONG-TERM STRATEGY LEADS TO FUTURE SUCCESS FOR YOUR CREATIVE BUSINESS
At times, thinking too far ahead can feel like a waste of time. After all, we’ve seen that our lives have taken so many unexpected turns over the years (for better and for worse), so it can feel like sticking to a strict plan for the future seems impossible.
But, dear Maker, I’m here to say that long-term planning for your creative business isn’t actually about controlling your future, but rather being prepared for the days ahead. Much like planting and harvesting, the preparation you sow now provides for your future. The end result is never about controlling the outcome, but rather taking pride and satisfaction in every seed you plant, grow, and harvest. But like any good farmer knows, you have to plan your plantings so you can reap the best harvest.
KNOW WHERE YOU ARE SO YOU KNOW WHERE YOU’RE GOING

In Navigating Change, Gary Gore shares a valuable lesson with his readers:
“In navigating through the forest, it is fundamental to know our location before we set out in any direction. If we do not know our location, we should stay in the same general area until we know where we are. To venture out only leads to confusion, and it makes any action plan we may have developed worthless or needlessly risky, compounding the problem. Our location is who and where we are.”
The premise of your long-term plan is to flesh out the path that takes your dream from the starting point to the finish line. In your creative business, this is your tactical and operational plan, interlaced with interim goals to create a landing block.
When you start with a vision for your future, you can begin to nail down the tangible achievements your dreams are meant to be made of. First, spell out your goals and objectives within your big dream. Next, assess what roadblocks are already in place and which ones you project to come.
Most entrepreneurs find that education or training is often their number one roadblock, right before funding. What are your solutions or alternatives to these hurdles? There will always be one or the other, dear Maker. If you can’t overcome it, can you jump over it? By assessing your market, assets, opportunities, and competition you can devise a plan of action through or around these.
A PLAN WITHOUT ACTION ISN’T A PLAN

Once your plan is in place, it’s ready to be met with action. As you continue to flesh out your plan, an operation will develop. As you monitor your progress and extinguish weak links, your policies will develop. Unsinkable businesses implement defense strategies they have devised in the face of the sneaky but expected roadblocks and written them into company policies.
Devise and implement a long-term business plan that focuses on three things: Prioritization, delegation, and execution. Without first knowing the end to the plan, you can’t begin. What looks good on paper may be too unrealistic once real life takes hold. That is where the beauty of these last few steps really begins to shine. Life is lived by first and foremost prioritizing the tasks laid out in front of you. Take on what only you can do first. After that, assess where you need to bring on help. No journey was ever meant to be conquered alone. Even Olympic gold medalists attribute much of their success to their coaches.
In A Maker’s Guide, I gave an example of what my long-term planning looks like. I prefer to break my goals down into 4 segments:
- Short-term (3 weeks to 3 months)
- Medium-term (3 months to 1 year)
- Long-term (1-5years)
- Lifelong (No limitations).
The common thread throughout all of my planning is that it begins with a goal. The goal is then held together by my plan to overcome costs and roadblocks, and ends with a very specific completion date. These threads keep my feet moving towards the finish line no matter the terrain.
What you do every day makes all the difference for the big picture. Chipping away and being consistent with your mission ensures your long-term success. When dreamers begin to do, they become world-changers. The seeds you sow today will bear great fruit — and therefore purpose — in your future. You can do this!
Until next time.
XOXO,
Amy
MAKE YOUR OWN CUSTOM FLORAL FRAME
It’s summertime, which means it’s time to brighten up your home with florals! We all love the fresh variety, but with this fun and easy craft project, you can enjoy a bouquet on the table all the time. If you’re having a birthday party or summer party, your guests will love doing this DIY project together.
Learn how to make the most of A Makers’ Studio’s newest DIY craft bundle by following along with Amy Howard in this week’s Maker Monday video.
MATERIALS YOU’LL NEED
To make your own beautiful floral frame, you’ll need the Watercolor Floral Frame Bundle, which includes:

- 2 oz Blessed Rescue Restore Paint
- Season Stencil
- Believe Stencil
- Spreader
- Sponge Brush
- Artist Brush
- Hey Y’all Gel Art Ink (sample)
- Hold your Horses Gel Art Ink (sample)
- Over Yonder Gel Art Ink (sample)
- Lord Have Mercy Gel Art Ink (sample)
You’ll also need bowls or containers to hold your paint, a cup to clean your artist brush in water, and a picture frame to decorate. (Pro tip: Amy found hers at Target for only a few dollars!) You can easily rescue and restore inexpensive frames from Goodwill, garage sales, or home goods stores.
HOW TO CREATE YOUR FLORAL FRAME
- Remove the glass and backing from your rescued picture frame.
- Shake up your Rescue Restore Paint and pour a small amount into a bowl or container.
- Load up your sponge brush and paint your frame using long, clean strokes. Whether your frame is raw or has an old finish, the Rescue Restore Paint will work on it! It also has no strong smell or VOCs. Be sure to protect your clothing with an apron!
- Let your first coat of Rescue Restore Paint dry for about 15 minutes. Then, apply a second coat of paint and let that dry.
5. Place portions of the Season Stencil on your frame. Amy suggests letting the flowers fall off the edge of the frame for a pretty visual effect. Once you’ve positioned the flowers where you like, remove the stencil’s adhesive backing and stick them to your frame.

6. Load up your spreader with Hold Your Horses Gel Art Ink and apply it on top of the stencil, using pressure to make sure it goes through.


7. Let the Hold Your Horses ink dry.
8. Once it’s dry after about 15 minutes, add a quote to the frame’s glass. Apply the Believe Stencil to the center of the glass.

9. Load up your spreader with Hold Your Horses and apply it on top of the stencil, pushing through to the glass.

10. Now, it’s time to paint the flowers! In another bowl or container, mix a small amount of tap water with Hey Y’all using your artist brush.

11. Load up your artist brush with paint, dab it gently on a dry surface like a paper plate or spare cardboard, then fill in some of the flowers on your frame.


12. Once you’re finished with Hey Y’all, swish your artist brush in a cup of clean tap water to rinse.
13. Repeat steps 9 and 10 with Over Yonder and Lord Have Mercy. To get a pretty green color, mix a bit of Hey Y’all and Over Yonder together before painting.

14. Relax, have fun, and enjoy painting your frame!
Once it’s completely dry, your floral frame is ready to be hung on the wall or placed on a countertop to brighten up your space. Isn’t it the cutest?
DON’T MISS A MAKERS’ STUDIO NEXT DIY PROJECT
Did you love making this fun frame? Amy does this every week, live at 10am on Mondays. All you have to do to see next week’s project (and all our previous ones) is to Like and Follow our Facebook page so you don’t miss out. Join next week’s live video for more tips and techniques to help you make the most out of your exclusive Maker Monday kits!
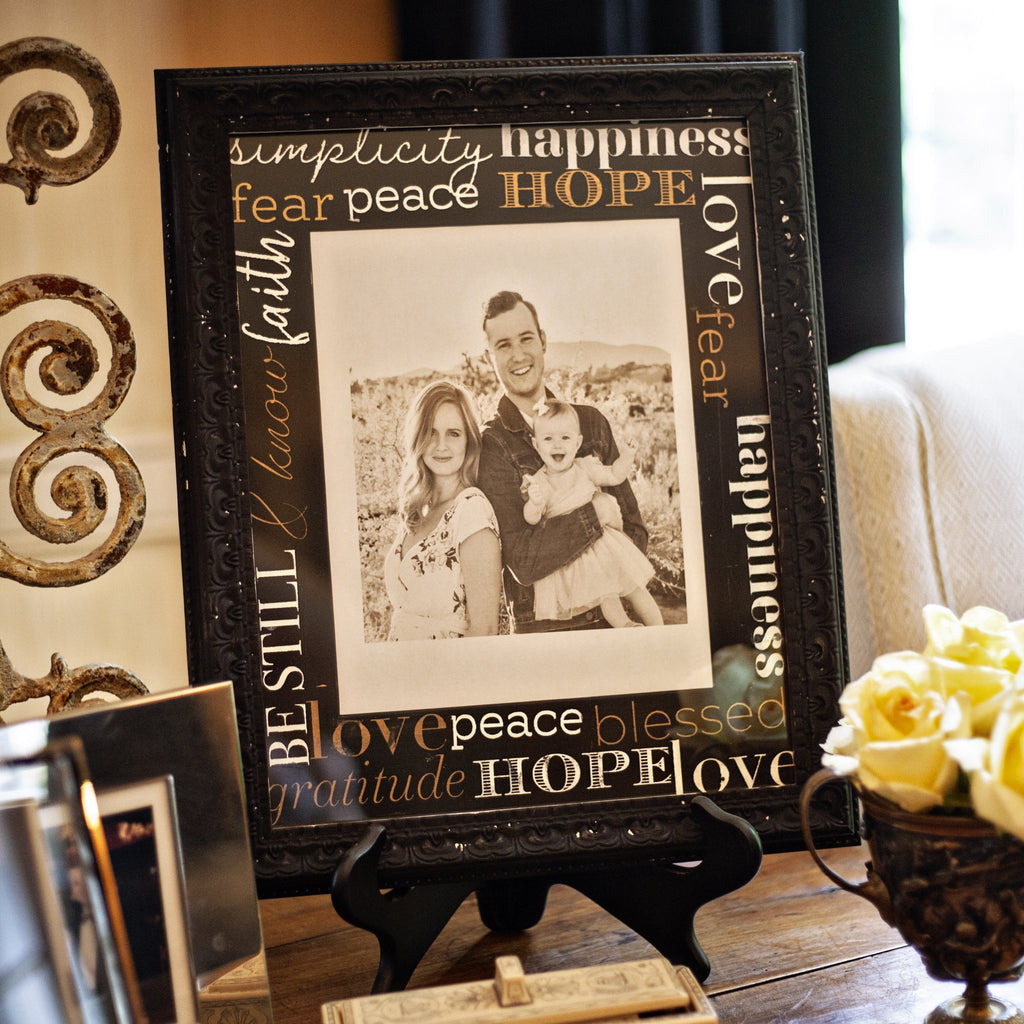
DISPLAY TREASURED MEMORIES WITH A KEEPSAKE FRAME
You love your home, but there are a lot of empty walls in it. You’d love to dress them up, but buying art and empty frames can be pretty expensive, and they feel so impersonal. Does this sound familiar?
Why not rescue a frame from garage sales or Goodwill and make it your own with our latest Inspirational Frame Bundle? With some paint and stencils, you’ll create your very own customized photo frame that will look beautiful on your walls. They also make great gifts for Father’s Day, birthdays, and holidays!
To see how Amy Howard transforms a couple of rescued frames and follow along with your kit, be sure to watch this week’s Maker Monday video:
MATERIALS YOU’LL NEED
To make your own family photo frame, you’ll need the Inspirational Frame Bundle, which includes:

- Little Black Dress 2oz Rescue Restore Paint
- Metallic Gold ChalkArt™ sample
- Metallic Copper ChalkArt™ sample
- Peace And Joy ChalkArt™ sample
- Spreader
- Sponge Brush
- Be Still & Know stencil
You’ll also need a container to hold your paint and a photo frame with backing and a wide mat. If you find a great frame with broken or missing glass, that will work too!
CREATING YOUR PHOTO FRAME
- Take apart your rescued frame and separate the frame, mat, and glass.

2. Pour a small amount of Little Black Dress into a container. Paint your mat in long, clean strokes with your sponge brush. Allow it to dry for about 10 to 15 minutes.

3. Cut your stencils apart but do not remove the adhesive backing yet. Lay the stencils down where you want to place them on the mat.


4. Next, blend small amounts of the Metallic Gold ChalkArt™ with the Metallic Copper ChalkArt™ to create a beautiful rose gold color.

5. Remove the adhesive backing to your stencils and place them back down on your mat.
6. Then, load your spreader with your new rose gold mixture and apply it to some of the stencils. Be sure to use a little pressure so that the rose gold pushes through the stencil to the mat.

7. Use the same technique and a clean spreader to apply Peace and Joy ChalkArt™ to your other stencils.
8. Remove your stencils to wash them and let everything dry. To clean up any paint spots, simply take a clean rag, dip it in water, and wipe it off your mat.
9. Find a family picture and reassemble your frame!
Et voila! Your beautiful keepsake frame is ready to hang and enjoy.
DID YOU LOVE THIS KEEPSAKE FRAME TUTORIAL?

On this week’s live video, Amy shares even more tips and tricks for using the amazing products in this bundle, so make sure to follow along. And don’t forget to watch Maker Monday each week — all you need to do is “Like” and follow our Facebook page. Each Monday at 10am, you’ll get more advice from Amy on how to make the most of your Maker Monday bundles.

A DAILY AGENDA FOR YOUR CREATIVE BUSINESS
For creative types, hearing the words “discipline” or “structure” can make you hesitant. After all, many artistic personalities thrive in uncontrolled environments, right?
You may do some of your best creative DIY and crafting work when the mood strikes, but staying true to yourself doesn’t mean you should totally disregard organization, either. A daily agenda is a powerful tool you can use to build your creative business beyond your wildest expectations.
Here’s how to craft a daily agenda that will help you meet your goals as a Maker — and still be respectful of your creative process.
WRITE A TO-DO LIST FIRST

To create an actionable daily agenda, first, write down everything you need to accomplish for the day. Anything business-related, personal errands, big tasks, and small tasks. Once you’ve written everything down you’ll notice that your responsibilities typically fall into three categories: people, places, and priorities. Then, determine which tasks are the most important or demanding. Which ones absolutely must get done? Which will take total focus and concentration?
ASSIGN TASKS TO TIME SLOTS
You’ll then start assigning tasks to time slots. Before you start choosing tasks, be sure to start your day with a little personal time. Take fifteen minutes, half an hour, or an hour to spend time on your well-being. During this time you may choose to meditate, read, pray, journal, or exercise. Or perhaps your personal time is spent cooking a nutritious breakfast and eating it mindfully with a cup of coffee. Whatever you choose to do during your alone time, you’ll be able to tackle the rest of your day with energy and a clear mind.
Now that you have your personal time on your agenda, you can start adding tasks. Begin with your most demanding or high-priority tasks first. Studies have shown that our brain function peaks in those first hours after waking, so it’s best to get those tasks done early in the day. If you have meetings scheduled for specific hour blocks, add those in next. Then, place your more flexible tasks in spots where they make the most sense.
TWEAK YOUR DAILY AGENDA IF NEEDED

Once you have your day planned out, look it over again. Are there tasks that would fit better on a different day’s agenda? Move it to that day instead! Are you afraid you haven’t blocked out enough time for a bigger task? Shuffle things around to give yourself more time. Know your limits and accept your habits. If you know you start feeling drained around 2 to 3 pm, schedule easier tasks for that period. Pencil in a short break so you can go for a walk to re-energize. Never be afraid to be choosy with your agenda.
And of course, schedule some downtime and playtime for yourself when you need it. When you’ve already allotted time to tackle your big important tasks, you won’t feel guilty spending a little time playing creatively or relaxing. Everything is accounted for.
If you aren’t consciously choosing your steps, your steps are choosing for you. Living life without structure seems fun, but it can grow into aimlessness and boredom quickly. A daily agenda can help you live with intention, spend your time efficiently, and meet your goals. With a little discipline and self-awareness, not one hour of your day is wasted.
XO, Amy Howard
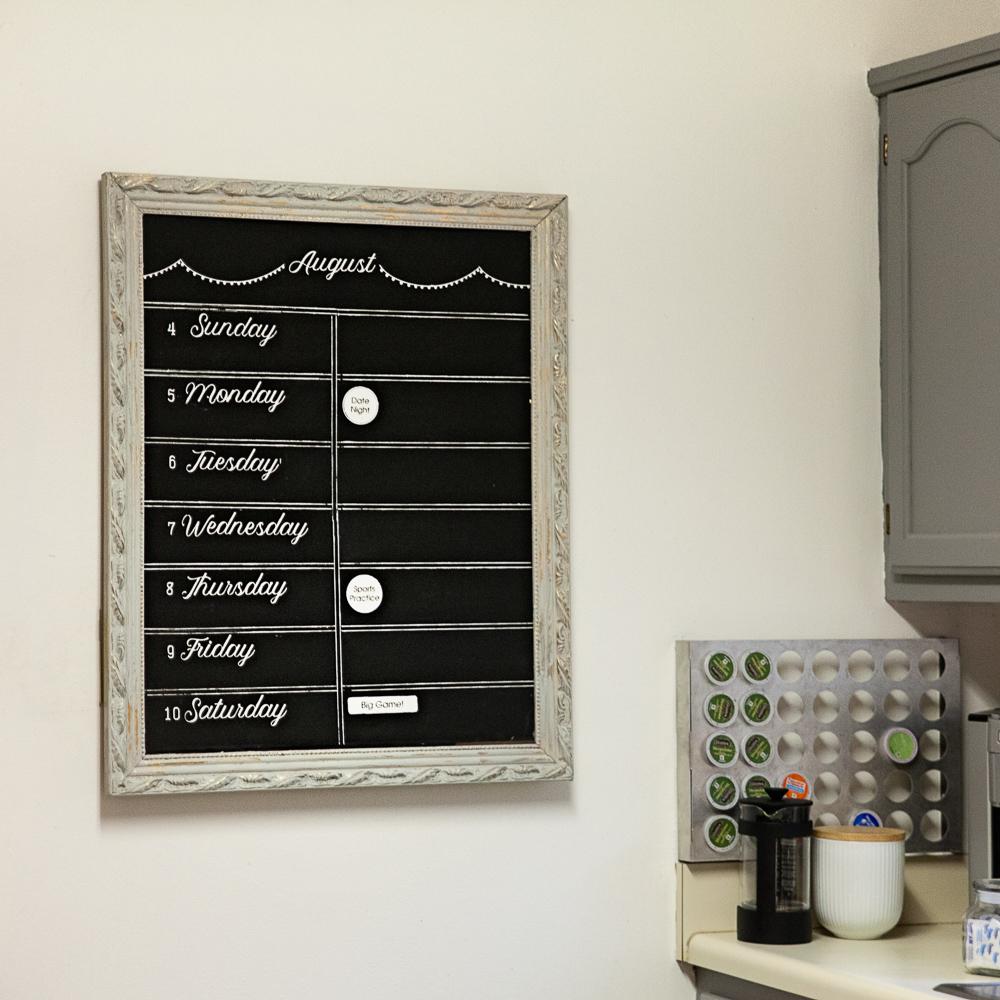
CREATIVE & CUSTOM CHALKBOARD CALENDAR
Calendars are necessary if you want to keep your family on schedule, but that doesn’t mean you’re stuck with pinning something unattractive on the wall or creating a scheduling binder from scratch! Instead, make your own customized calendar with an old frame and some Rescue Restore Paint. In this fun Maker Monday video, Amy Howard walks you through how to create your own one-of-a-kind chalkboard calendar using A Makers’ Studio’s new Chalkboard Calendar Bundle. Once you’ve got the tools you need, you can check out the Maker Monday video below to start crafting:
MATERIALS YOU’LL NEED
For this chalkboard calendar project, you’ll need the following items, all of which you can find in the Chalkboard Calendar Bundle:

- Peace and Joy ChalkArt™
- Gathered Rescue Restore Paint (2oz)
- Little Black Dress Rescue Restore Paint
- Calendar stencil
- Sponge brush
- Spreader
You’ll also need a frame in whatever size and material you prefer (the bigger the better, though)! Also, don’t forget the chalk.
CREATE A CUSTOM CHALKBOARD CALENDAR WITH AMY
- Take your frame apart by removing the backing and the glass.
- Paint the backing of your frame with Little Black Dress Rescue Restore Paint and allow it to dry.
- Cut the days of the week and month you want to use out of the calendar stencil. Before you apply paint to your stencils, decide where you want them to go, as this will determine where you place your lines.
- Cut out the line stencils on the right side of your stencil sheet, making sure to cut only the line closest to the other stencils. Then, lay the stencil down to do your first line horizontally (across) your backing. Apply Peace and Joy ChalkArt™ with your spreader. Continue this until your line is finished, washing your stencil when needed.
- Lay your vertical line and repeat Step 4. Then continue the horizontal lines that will separate your days of the week, completing the grid.
- Stencil in your days of the week in their designated “boxes” with Peace and Joy ChalkArt™, and then add your month at the top.
- Season your calendar by turning your chalk sideways and rubbing it across the backing of your frame. Then, your chalkboard is ready to use!
- Optional: Paint your frame or dry brush it using the Gathered Rescue Restore Paint. Let the paint dry and then put your frame back together.
In no time at all, you’ve got an adorable chalkboard calendar you can wipe clean and re-customize each week or month! Best of all, it’s a one-of-a-kind calendar you can’t find anywhere else.
STAY TUNED FOR MORE MAKER MONDAYS
We just love this fun chalkboard calendar project! But this isn’t the only time Amy walks you through a simple DIY project like this — she does it every Monday at 10am Central! If you love this week’s Maker Monday video, check out next week’s! Be sure to follow and “Like” us on Facebook to get notified when we go live.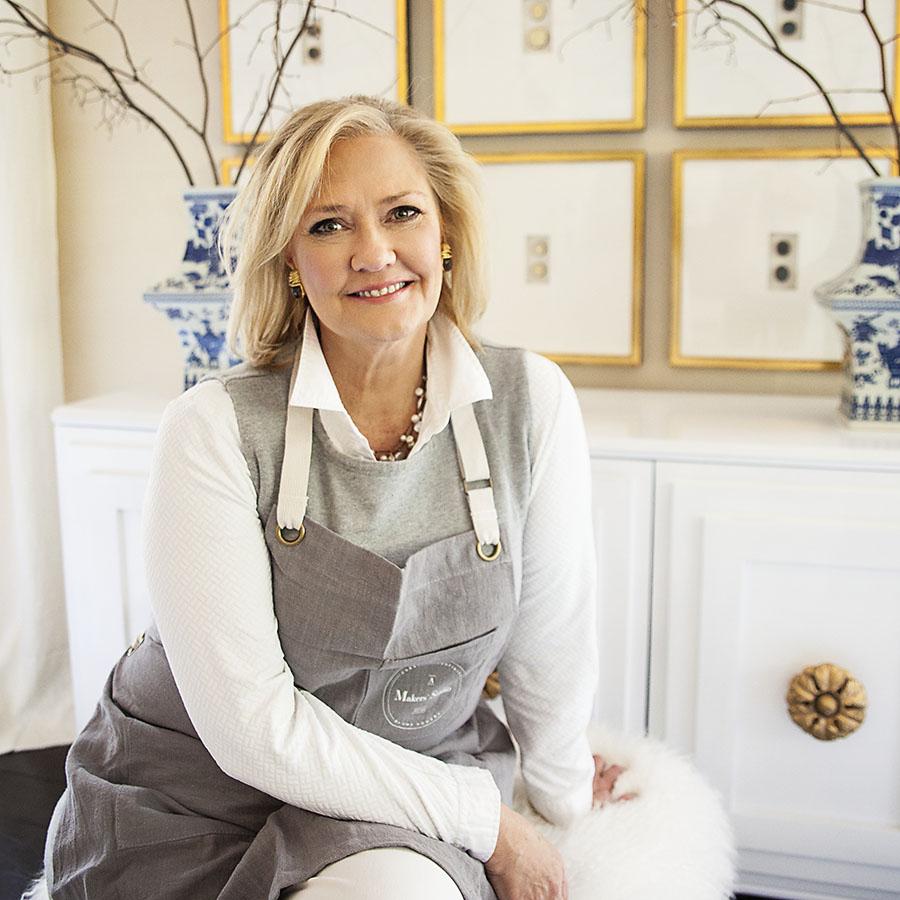
STRENGTHS AND PASSIONS IN CREATIVE BUSINESS
Whether you’re a day-jobber with a crafting side hustle or crafting and making is your full-time business, it can be hard to commit to doing what you love every day. But the truth is, changing jobs, coming up with a new idea for a side business, or avoiding committing to your specialty within your Maker business are all signs that you haven’t really found your strengths yet.
If we want to have successful lives, and to truly live (and work) with purpose, we have to focus on the work that makes us feel valuable and satisfied. So how do we do that?
GET HONEST WITH YOURSELF

While we talk about being honest with ourselves and acknowledging that our dreams are to be a creative entrepreneur, we often don’t share that dream or commit to it. We also don’t show the full extent of our excitement or interest in our craft. Why? Because we think it sounds silly, or because we don’t want to jinx it.
But we crave purpose, and for some of us, crafting and making is our purpose. That’s why committing to what you want to do, and getting clear on what you want to do, is the best way to build a thriving creative business and a happy life. This honesty will allow you to pursue what makes you feel most fulfilled, and that’s something that will keep you coming back day after day, year after year. But to get honest with yourself, you have to know which questions to ask.
FOCUS ON YOUR STRENGTHS

According to Susan Sorenson, a writer for Gallup.com, “The best way for people to grow and develop is to identify how they most naturally think, feel, and behave — their talents — then build on those talents to create strengths, or the ability to consistently provide near-perfect performance.”
When it comes to your creative business or interests, what are your greatest strengths? Do you have a special knack for teaching people how to create their own artwork, or can you create DIY décor comparable to what’s sold in trendy boutiques? Also ask yourself: What are you more passionate about than anything else in the world? Do you get worked up talking about different paint brushes and tools, or could you talk all day about DIY products? The answers are limitless, but they’re usually the first thing that pops into your head after you ask the question, so don’t overthink it.
In these two answers lie what you need to make a truly successful Maker business that you’re fulfilled and sustained by. You don’t have to leave crafting to be a weekend hobby; it can be front and center in your life — and just think how much happier that would make you!
You can pair your strengths, those things that you’re better at than others may be, and your passions, those things you can talk about until you’re blue in the face. Once they’re paired, you have an unstoppable foundation that will help you differentiate your Maker business, as well as fuel your in the process.
So what can you do to get clear on those strengths and passions?
GET CLEAR ON WHAT MAKES YOU DIFFERENT

Answer the questions below to get an idea of your strengths and passions, and how you can combine those to create a stronger, more successful, more fulfilling Maker business.
- What am I most gifted at?
- What about me stands out to the people around me?
- Where do I thrive that is different from most?
- What value drives me more than anything else in the world?
- What do I find myself thinking about more often than anything else?
- When I have free time, what work do I gravitate towards?
Don’t shy away from being honest with yourself about where your current position aligns with your purpose, or where you really want to be in your heart of hearts. Remember, too, that our dreams always seem bigger than we are in the beginning. The answer to all those rising fears is to start with persistent and measurable steps and to remember why you started by keeping in mind those passions and strengths you just listed.
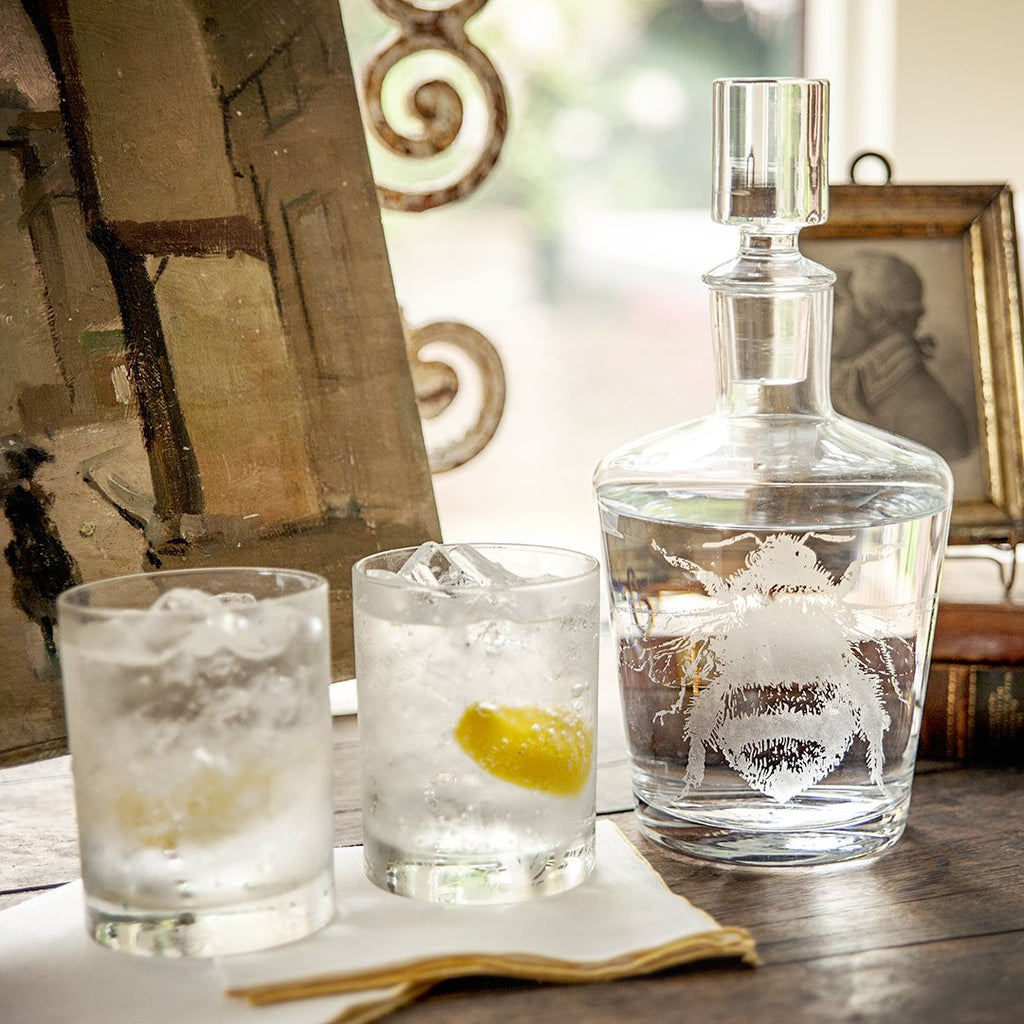
GLASS ETCHING WITH THE ALL THINGS ETCHING BUNDLE
What’s more elegant and classy than etched glass? Plain glass can get a whole new look with a simple etching application, which is why we created something new for Maker Monday: The All Things Etching Bundle. In the bundle, you get A Makers’ Studio Etching Cream, a stencil, and an artist brush that you need to take glass from dull to decorative.
Don’t know what glass etching is? Etching is a process of essentially “eating away” at glass to wear it down to a flatter, less translucent material. Glass etching cream is permanent and dishwasher, microwave, and food-safe. Glass etching works on anything made from glass, including Pyrex dishes, plates, cups, vases, champagne flutes, serving dishes, mirrors, and more.
If you want to learn how to etch glass with beautiful quotes, monograms, or even decorative designs, this episode of Maker Monday (and our All Things Etching Bundle!) is for you:
MATERIALS YOU’LL NEED
The All Things Etching Bundle, which includes:
You’ll also need a glass surface of your choice, whether it’s a vase, a plate, or something else!
HOW TO ETCH GLASS WITH ALL THINGS ETCHING BUNDLE

Lay your stencil on your glass surface, paying close attention to how well your stencil sticks. Feel free to use tape if you’re worried about etching on the edge of your stencil, too. Shake your etching cream really well, as it does settle over time. Then, dip your stiff artist’s brush into the etching cream and paint it on very thick. You may need to apply the etching cream multiple times to get thicker layers on your stencil, even up to 1/8th of an inch! Also be careful to not get etching cream anywhere but on your stencil, as it will leave etching marks wherever it touches. The more you agitate your etching cream with your brush, it will break down the glass faster and make your stencil transfer much more successful. Leave the cream on for 3 to 5 minutes, then pull your stencil off. Make sure to wash your stencil and artist brush with soap and water, then they can be used for another etching project!
Your new glass design is also ready to use in 45 minutes to an hour. Pretty simple, huh?
MORE FROM MAKER MONDAYS

Etching gives glass such a classy, high-end look. Etch virtually any glass surface with this etching cream, whether it’s for your home or for a gift. Because it’s such a simple technique, you can do this as a quick addition to your potluck dishes, before delivering flowers in a glass vase, or personalizing glasses for a party! The options are endless, so get creative and share your ideas with us.
Don’t forget that you can get this stencil, the container of etching cream, and an artist brush in our All Things Etching bundle, which is a real steal! We’ll also see you back on Facebook every Monday at 10am Central time with a new project, bundle, or technique to show you so you can craft a beautiful life. Follow and “Like” our Facebook page if you want notifications when Maker Monday goes live!
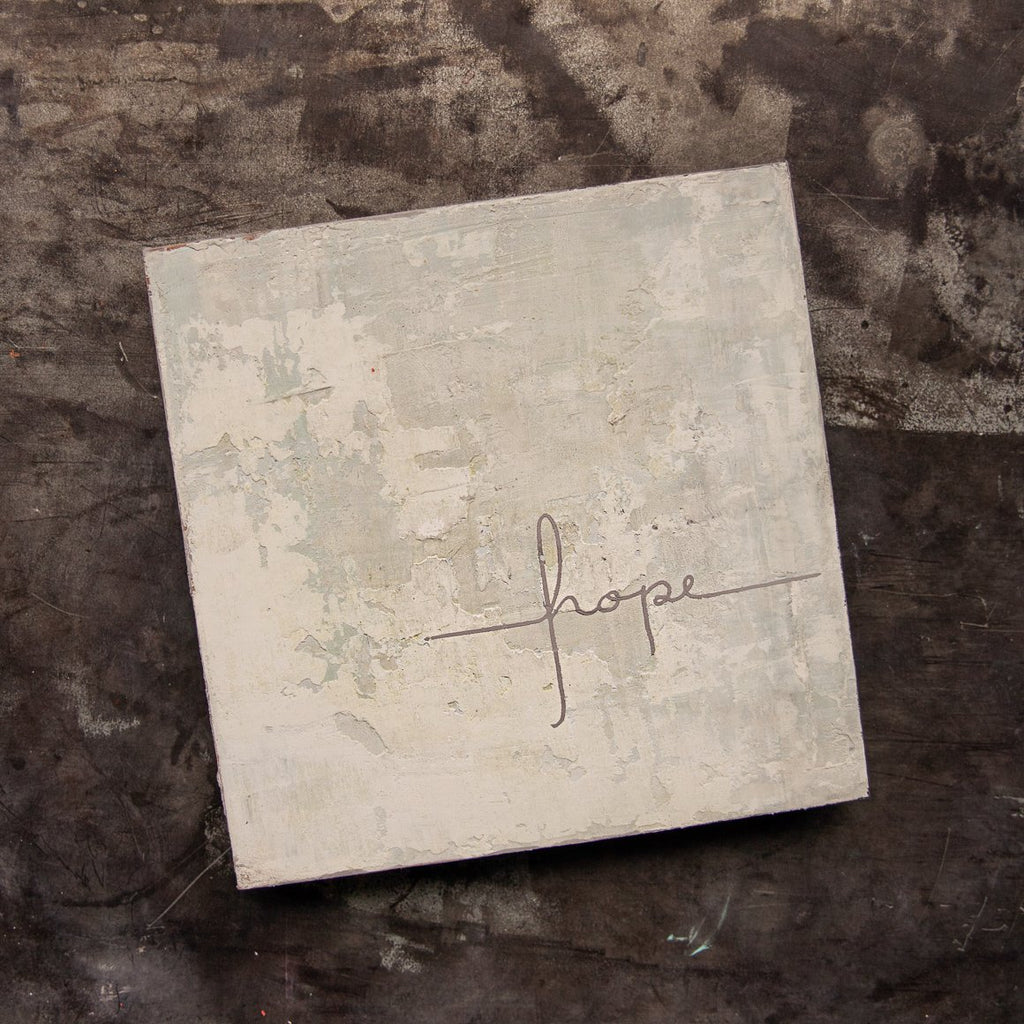
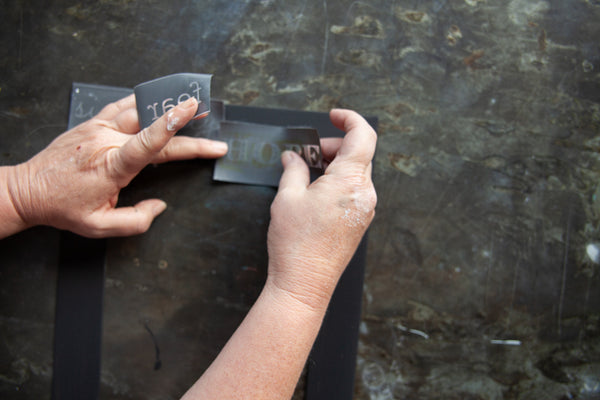
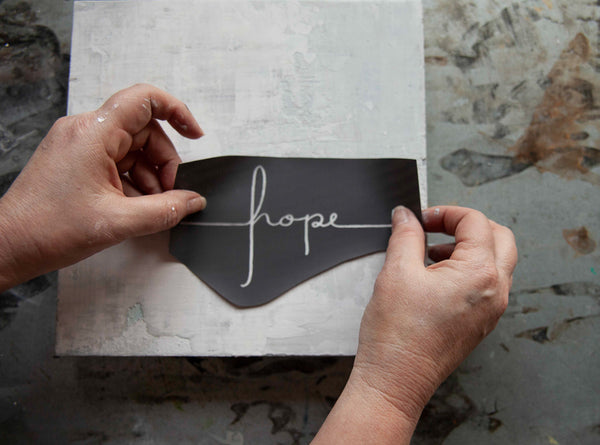
A REMINDER OF HOPE: TEXTURED WALL ART PROJECT
Wall art is about more than filling space or matching your existing decor. It should also be about filling your home (or office) with things that lift you up. That’s why we love this Reminder of Hope wall art project. Using plaster, ChalkArt™, and some beautiful stencils, you can create a one-of-a-kind message that reminds you to always keep the faith.

MATERIALS YOU’LL NEED

- 10x10 surface
- Rescue Restore Paint in Gathered (2oz)
- Cute As A Button ChalkArt™
- Can't Never Could ChalkArt™
- Venetian Plaster
- Hope Faith stencil
- Spreader (2)
You will also need a small spray bottle, scissors, a bowl, and a spoon. To see how Amy Howard herself recommends creating this wall art, make sure to watch this week’s Maker Monday video:
CREATING YOUR TEXTURED WALL ART
- Mix your plaster with water, using 2 parts plaster to 3 parts water. You want it to be the consistency of thicker sour cream.


2. Once your plaster is properly mixed, use your spreader to apply a thin coat of plaster to your surface. Also apply consistently, scraping the excess as you go. Allow it to dry.


3. Cut one spreader into 3 parts.
4. Spray your dried plaster surface with a little bit of water.
5. Using one spreader, apply your Cute As A Button ChalkArt™ in different sections of your board. The water will make it easier to pull the chalk paint across the plaster, as well as leave an authentic, aged appearance.

6. Overlay plaster on the chalk paint, moving your spreader (loaded with the plaster) lightly up and down and from side to side. Continue to add plaster until you only get a small peek-through of the Cute As A Button blue paint.

7. Next, lay in Can't Never Could ChalkArt™ and repeat Steps 5 and 6. Apply this layer only in small, choppy strokes — do not cover the entire surface. This paint will dry very light, but you don’t want a lot of it.

8. Using your third spreader, apply the Gathered Rescue Restore paint lightly to your surface. Use this paint layer to blend the gray, blue, and plaster, making sure to apply as thin as possible and to leave negative space (with no Rescue Restore paint).
9. Continue to add colors and plaster until you are satisfied.
10. Once all the layers of plaster and paint are completely dry, cut the Hope Faith stencil and lay it on your surface in the lower right quadrant. Then, paint the “Hope” text using the Can't Never Could ChalkArt™ using a clean spreader.

11. Remove the stencil, wash it and lay flat to dry.


Of course, Amy shares a ton of tips and extra insights on this project, so make sure to tune into the Maker Monday video below.
If you want more great tips like this, and want to keep learning how to make the most of your Maker Monday kits, follow us on Facebook. Then, tune in on Mondays at 10am Central for these fun tutorials!
We’re looking forward to crafting a beautiful life with you.
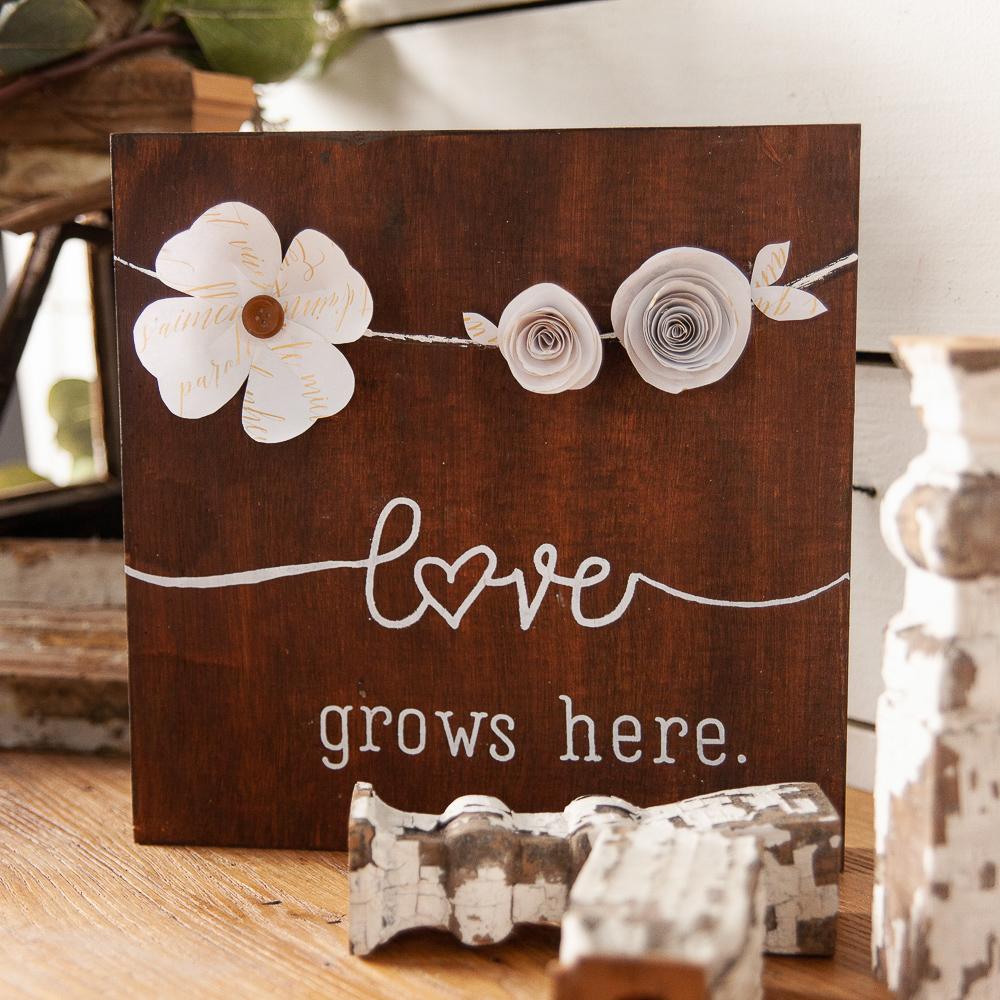
TELL THE WORLD: LOVE GROWS HERE
Your home is a place where you feel most comfortable, safe, and loved. What better way to tell that to your guests than with a sign that says “Love Grows Here”? This week on our Maker Monday on Facebook, Amy is showing Makers how to create a lovely piece for your home or loved ones. This artwork makes the perfect housewarming project, whether for yourself or someone else!
MATERIALS YOU’LL NEED
- 10x10 wood surface
- English Walnut Gel Stain
- Peace and Joy ChalkArt™
- Metallic Gold ChalkArt™
- Love stencil (sold out)
- Alphabet stencil
- French Script stencil
- Sponge brush
- Artist brush
- Spreader
You will also need printer paper, scissors, and a hot glue gun.
HOW TO MAKE YOUR “LOVE GROWS HERE” SIGN
1. Apply the English Walnut Gel Stain to your surface with your sponge brush, using consistent strokes. Allow it to dry.

2. While your gel stain dries, apply the French Script stencil on blank printer paper and paint the stencil with the Metallic Gold ChalkArt™ using the spreader in your kit. Clean your spreader and allow the paper to dry.
3. Lay the “Love” portion of your stencil about three-quarters of the way down on your board, allowing room above for your flowers. Apply the Peace And Joy ChalkArt™ with your spreader, then remove the stencil. Wash it and lay flat to dry.


4. With your artist brush and the Peace and Joy ChalkArt™, freehand a string in the top third of your board. This “string” will hold your flowers.
5. Use the Alphabet stencil to stencil the words "grows here" underneath the word "love."

6. Cut circles out of the paper with the French script on it. Then cut the circle into a spiral. Roll up the paper from the inside edge to create a flower. Once you have your flower shaped, use your hot glue gun to glue the flower to your board.
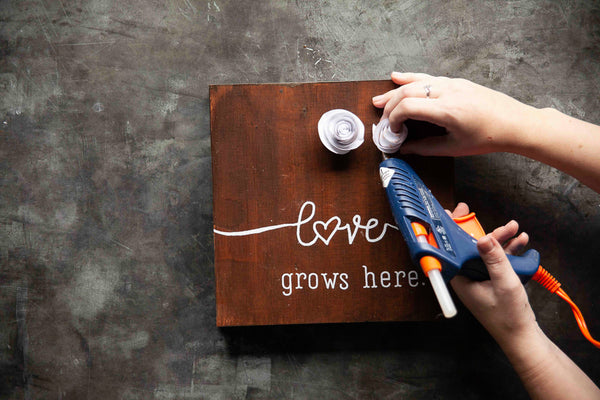
7. For the other flower, cut out petal shapes and then cut a slit in the bottom of each “petal” so you can connect them. Once your flower petals are connected, glue the edges together and hot glue it to your board.
Of course, if you want more of Amy’s tips and tricks, tune into the Maker Monday video, which is recorded on our Facebook page.
MORE FROM MAKER MONDAYS
Don’t forget to watch Maker Monday on our Facebook page every Monday at 10am Central. Amy will be there each week to give you tips on your next kit or Maker project, so “Like” and follow us so you can see her!
We’re looking forward to crafting a beautiful life with you.