Inside A Makers' Studio
Inside A Makers' Studio

DIY Inspirational Shirt | Using Mesh Stencils
December 30, 2022
Imagine inspiring someone's life to be better just by going about your day with a great message printed on what you're wearing.
With a few tools from A Maker's Studio, you can do exactly that and turn simple, everyday shirts into joyful and inspiring pieces for everyone to see.
STEP 1: PICK A STENCIL AND A COLOR

Choose a reusable mesh stencil design that you like and a Gel Art Ink color to match.
For this project, we are going to use the Way Maker Mesh Stencil and Hold Your Horses - Gel Art Ink.
STEP 2: PREP YOUR SHIRT
Put a cardboard on the inside of the shirt you are working with.This will help make sure that the paint you are applying on either side of the shirt doesn’t bleed through the other.
STEP 3: APPLY THE STENCIL

Remove its backing to expose the stencil's adhesive side and carefully place it on your shirt.
STEP 4: COLOR IT UP

Squirt some Gel Art Ink along one edge of your spreader. Hold your spreader at a 45-degree angle and spread the ink evenly over your stencil. Make sure that you are pushing the Gel Art Ink adequately through the mesh and onto the shirt.
STEP 5: LET IT DRY

When you're done, gently peel the stencil off and allow the ink on your shirt to air dry for at least two hours.
STEP 6: WASH YOUR STENCIL

Don’t let the ink dry on your stencil. Wash it right after use.
Place your stencil in water and use a clean rag to help wipe the ink off of it.
Then, take your stencil out of the water and lay it on a flat surface with the adhesive side up. Leave the stencil to air dry.
STEP 6: IRON THE PRINT

Place a lint-free rag on top of your design. Go over the rag with an iron for about 5 minutes. The heat is going to help the ink to set.
SOME REMINDERS:
If you get some of the Gel Art Ink on other parts of the shirt where you don't want it, wipe it off with a clean rag before it starts to set.After using your newly designed shirt, turn it inside out and wash it with cool water. Keep it out of the dryer to prevent the design from fading quickly.
If you need to use a dryer, use the cool setting and keep the shirt turned inside out.
Start spreading joy and inspiration today using these products:
Mesh Stencil - Way Maker
https://www.shopamakers.com/products/mesh-stencil-way-maker-8-5-x-11
Gel Art Ink - Hold Your Horses
https://www.shopamakers.com/products/gel-art-ink-hold-your-horses

DIY SALT DOUGH GIFT TAGS | Using Clear Stamps and Gel Art Ink
December 11, 2020
These Salt Dough Gift Tags are so elegant and unique. Create these to impress your gift recipients this year! Watch as Amy & Michelle show you the best techniques for creating these tags.
Supplies:
- 2 Cups All Purpose Flour
- 1 Cup Salt
- ½ Cup Water
- Bauhaus Buff - One Step Paint
- Gel Art Ink – Grass Is Always Greener
- Gel Art Ink – Bless His Heart
- Gel Art Ink – Blowin Up a Storm
- Gel Art Ink – Hold Your Horses
- Clear Stamp – I Love You/Family
- Clear Stamp – Foliage
- Foam Dome Brush
- Cookie or Biscuit Cutters (or some other round object)
Instructions:
- In a large bowl, mix together flour and salt.
- In a smaller bowl, mix together water and ½ cup Rescue Restore Paint Blessed.
- Then pour paint mixture into larger bowl of flour/salt mixture. Mix together until large ball forms.
- Place ball of dough onto floured surface. Using a rolling pin, work the dough until it is between ¼ and ½ inch thick.
- Use cutters to create tags, placing them on a sheet of wax paper.
- Using a pencil or back end of an artist brush, create holes for threading string through.
- Then place a dab of Gel Art Ink on a clean surface and load the foam dome brush by dabbing it with an up and down motion, offloading as you go.
- Carefully dab the ink onto the stamp, using the same up down motion. Be sure to wipe off any excess ink that gets on the rim of the stamp.
- Now carefully place the stamp straight down onto the tag, applying medium pressure to ensure it stamps evenly.
- Then lift stamp straight up washing it with lukewarm water once done.
- Optional: You can add little red dots/berries by using a small brush and Bless His Heart Gel Art Ink.
- Allow tags to fully air dry for 72 hours, flipping them once daily.


HOW TO CLEAN YOUR MESH STENCILS
August 05, 2020
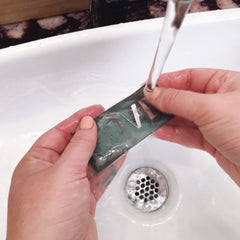
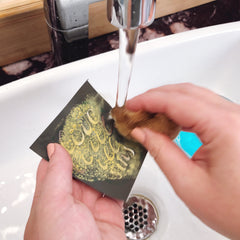
WATCH THIS VIDEO TO LEARN HOW TO CLEAN YOUR STENCILS. YOU CAN USE YOUR STENCILS OVER AND OVER AGAIN WITH PROPER CARE.
FOR CHALKART, GEL ART INK, AND CERAMIC PAINTS - LUKEWARM WATER AND YOUR HANDS SHOULD DO THE TRICK.


FOR PAINTS AND GILDING SIZE, YOU MAY WANT TO USE DISH SOAP AND A SPONGE.


LASTLY, LAY STICKY SIDE UP TO DRY!


DIY TOWEL DIP DYEING
July 16, 2020
In this two-part tutorial, learn how to transform inexpensive, plain-looking tea towels into colorful items that are not just lovely to look at but can lift your spirits too.
These custom towels are great to use around your home or to give out as presents at any time of the year.
PART I: TOWEL DIP
STEP 1: PREPARE THE PAINT

This project uses Summer Nights - Rescue Restore Paint.
2 ounces of Rescue Restore Paint mixed with 20 ounces of water should be enough to color at least 3-4 tea towels.
STEP 2: DIP YOUR TOWEL

Hold your towel up and, coming from both sides, gather it towards the middle.
Dip half of the towel into the paint and let it soak up some color.
STEP 3: SQUEEZE OUT EXCESS PAINT
With one hand gripping the dry half of your towel, slowly pull the colored half out of the paint.Squeeze the excess paint out by letting the colored half of your towel pass through between the forefinger and thumb of your other hand.
Do this slowly to avoid splashing paint on yourself and make sure that your towel is not dripping with paint after this step.
STEP 4: MOVE THE PAINT
In another container with clean water in it, dampen the colored half of your towel.Use one hand to hold the towel up, with the colored half at the top.
With your other hand, squeeze your towel from top to bottom, helping the paint move downward, effectively covering the lower half of your towel with lighter shades of Summer Nights.
STEP 5: DRY YOUR TOWEL
Open your towel up and lay it on a piece of cardboard to dry.PART 2: STENCIL APPLICATION
STEP 1: PREP YOUR TOWEL
Lay your dry towel down flat.Have a cardboard underneath it to prevent ink from staining your work surface.
STEP 2: APPLY THE STENCIL

This project uses the Bless the Lord Mesh Stencil.Peel the backing off to expose the adhesive side and apply the stencil on your towel.
STEP 3: SPREAD YOUR INK

This project uses Hold Your Horses Gel Art Ink.
Squeeze some ink out along one edge of your spreader and apply the ink all over your stencil, holding your spreader at a 45-degree angle as you do so.
STEP 4: REMOVE THE STENCIL
Carefully peel your stencil off and rinse it right after use.Let it dry on a flat surface with the adhesive side up.
STEP 5: DRY AND HEAT-SET

Allow your towel to dry for at least 2 hours.
After which, heat-set your newly applied design. Place a lint-free rag on top of it and go over the rag with an iron for about 5 minutes.
Replicate this project and create your own customized tea towels with these products:
Summer Nights - Rescue Restore Paint
https://www.shopamakers.com/products/summer-nights-rescue-restore-paint
Mesh Stencil - Bless the Lord - 8.5x11
https://www.shopamakers.com/products/mesh-stencil-bless-the-lord-8-5-x-11
Chalkart Spreader
https://www.shopamakers.com/products/chalkart-spreader
Gel Art Ink - Hold Your Horses
https://www.shopamakers.com/products/gel-art-ink-hold-your-horses
Other Products Mentioned in the Video:
Gel Art Ink
https://www.shopamakers.com/collections/gel-art-ink
Goodness Gracious - Rescue Restore Paint
https://www.shopamakers.com/products/goodness-gracious-rescue-restore-paint
Mesh Stencil - Adventure - 8.5x11
https://www.shopamakers.com/products/mesh-stencil-adventure-8-5x11
Mesh Stencil - Birds - 8.5x11
https://www.shopamakers.com/products/mesh-stencil-birds-8-5-x-12

WATERCOLOR WASH PROJECT
June 25, 2019
Arguably the most frustrating thing about starting a craft project is trying to find all the right supplies you’ll need to complete it. That’s why we’ve put together Maker Monday bundles like this Watercolor Wash Bundle, which includes a stencil, Gel Art Ink samples, and other tools. With this kit, you’ll be able to create a gorgeous framed quote on a watercolor background. Your watercolor artwork can add a touch of color and inspiration to a spot in your home, or make a sweet gift for someone else.
But we don’t just give you the tools and tell you to figure it out! Amy Howard walks you through each bundle every week on Maker Monday, and this week is no different. So make sure to check out the bundle and follow along with Amy in this video so you can make some beautiful watercolor decor and gifts:
MATERIALS YOU’LL NEED

You’ll need the materials included in the Watercolor Wash Bundle, which includes:
- Believe In Your Dreams Stencil
- If the Creek Don't Rise Gel Art Ink Sample
- Hey Y'all Gel Art Ink Sample
- Bless His Heart Gel Art Ink Sample
- Metallic Gold ChalkArt Sample
- Spreader
- Artist’s Brush
You’ll also need sheets of watercolor paper and new or rescued frames for this project, along with a dish or plate to hold your inks.
CREATING YOUR FRAMED WATERCOLOR ARTWORK
- First, add a few tablespoons of water to a dish or plate.
- Take your artist’s brush and dab a small amount of Bless His Heart Gel Art Ink into the water. Mix well. Use a ratio of 75% water and 25% ink to get the pretty pink watercolor wash you see in Amy’s video.
- Once you’ve mixed Bless His Heart with water, test out the watercolor wash on a scrap piece of paper to make sure you’re happy with the color.
- When you’re testing out the watercolor wash, you can also practice your brushstrokes. Hold the brush at an angle so the bristles are nearly horizontal. When you paint using angled, sweeping strokes, you’ll get that beautiful layered watercolor effect.
- Next, cut out the part of the stencil you’re going to use.
- Lay out the stencil on your sheet of watercolor paper (don’t remove the backing yet) to see how much of the sheet you’ll paint. The background should be a little bigger than the stencil, but leave enough room for a border.
- Set the stencil aside so you can begin painting your sheet with a watercolor wash. Remember to hold the brush horizontally and use long, continuous strokes.
- Spread the paint down the sheet with your brush to create a thin, layered look. It’s not going to look perfect, and that’s the effect you’re going for!
- Once your sheet is dry, remove the adhesive back to your stencil and apply it to the center of your sheet.
- Load up your spreader with a small amount of Metallic Gold ChalkArt.
- Apply it on top of your stencil. Use a little pressure to press the Metallic Gold through the stencil.
- Pull the stencil from your watercolor sheet and let it fully dry.
- Finally, you can place your watercolor sheet inside a new or rescued frame. It’s now ready to hang in your home or be gifted to someone else!
WATERCOLOR WONDERS

Whether you want to create a beautiful frame, decorate a tea towel, or even stationery, Amy shares a handful of great ways to use these Gel Art Ink samples. Be sure to check out this week’s Maker Monday video — and don’t forget the Watercolor Wash Kit. It has everything you need to get that beautiful watercolor wash… permanently!
For more tips on using your Maker Monday kits, Like and Follow A Makers’ Studio on Facebook. Tune in on Mondays at 10 am Central every week for great tutorials like these!

DIY MONOGRAMMED TOTE BAG
January 21, 2019
We all love super cute monogrammed tote bags, the ones that make a statement and can be used for virtually anything. But they cost so much more if you buy one from the store or a custom online shop… not to mention searching high and low for your perfect monogram design! We think everyone should be able to have a beautiful monogrammed tote bag, so today we’re sharing this fun and simple DIY monogrammed tote bag project.
MATERIALS NEEDED FOR YOUR DIY MONOGRAMMED TOTE BAG

- Your favorite 2 oz. Rescue Restore Paint
- A complimentary 2 oz. Rescue Restore Paint color
- Alphabet Monogram Stencil
- Foam Dome Brush 1.5”
- Masking tape
- A Makers’ Studio canvas tote bag
- Optional: Gold ChalkArt™
- Optional: Gilding Leaf for pineapple stencil*
* Pineapple stencil is included on the Alphabet Monogram stencil
HOW TO MONOGRAM A TOTE BAG
- Lay your tote flat on a surface, making sure to press out wrinkles or bumps.
- Choose the monogram for your initials and place them where you want them on the bag.
- Apply your first Rescue Restore Paint color to the first initial, making sure to apply an even layer to the fabric with your Foam Dome Brush. Let the first letter dry before applying the second and third. Repeat until all three initials are complete.

4. Wash your brush and the stencils, letting them dry thoroughly.
5. When letters are dry, lay out 2 strips of tape vertically across the tote, 1 1/2 inches apart. These vertical lines should align with your monogrammed initials.
6. Next, lay two pieces of tape horizontally across tote to protect the letters. These tape lines will also align with your initials and intersect the vertical tape lines.

7. Use the Foam Dome Brush to apply your second Rescue Restore Paint color to the taped off sections. Remove tape gently and allow to dry thoroughly.

8. Once your first stripe is dry, tape off 2 1/2 inch sections on either side of the middle stripe. Lay 4 pieces of tape vertically and 2 pieces horizontally to protect the middle strip and your monogrammed letters.

9. Use the Foam Dome Brush to apply the same Rescue Restore Paint color you used on your monogram letters. Remove tape immediately after application and allow the paint to dry.

10. Apply the pineapple stencil to the center strip, just above your initials. Use Rescue Restore Paint or Gold ChalkArt™ to paint the pineapple stencil on your tote.

11. Optional: For extra sparkle, you can apply your choice gold, silver, or copper gilding to the paint.
12. Let the paint dry overnight before using your new bag. Then, #enjoythebraggingrights — and a beautiful tote!
Because our Rescue Restore Paint is made with high-quality, natural pigments, you can expect your tote to handle plenty of use. Make one for yourself and all your friends, or apply these same steps to other materials, like lunch bags, pouches, and more. Make sure to take care of your stencils so you can use them again and again.
We want to see you wearing your new DIY monogrammed tote bag, so share it with us! Tag @amakersstudio on Instagram and use #enjoythebraggingrights to make sure we (and your community of fellow Makers) can see your beautiful work!

